Customizing Homepage
Customizing Homepage
Product: Muvi One (Classic)How to Add & Re-arrange Banner
Adding Banner Text in Multiple Languages
Adding/Editing Featured Sections
Introduction
Homepage is the most important aspect of your website. You need to make it more appealing to attract more users towards your website. You can easily customize your homepage by using various customizing options available in your CMS to make it more attractive. You can add Logo, Favicon, Banner etc. In the featured section, you can display your content in different categories. For instance, you can add sections like, New Releases, Most Viewed, Coming Soon etc.
How to Customize Homepage
There are various sections in the Homepage that you can customize like Logo, Favicon, Banner, Featured Sections etc.
Note: You will get the customize option for your Homepage according to the Template you select. For example, if you select the Traditional Template, then you will get fixed banner option on your Homepage. However, if you will select the Classic or Modern Template, then you will get the sliding banner option.
Let’s start with adding or changing the “Logo”.
Adding/Changing Logo
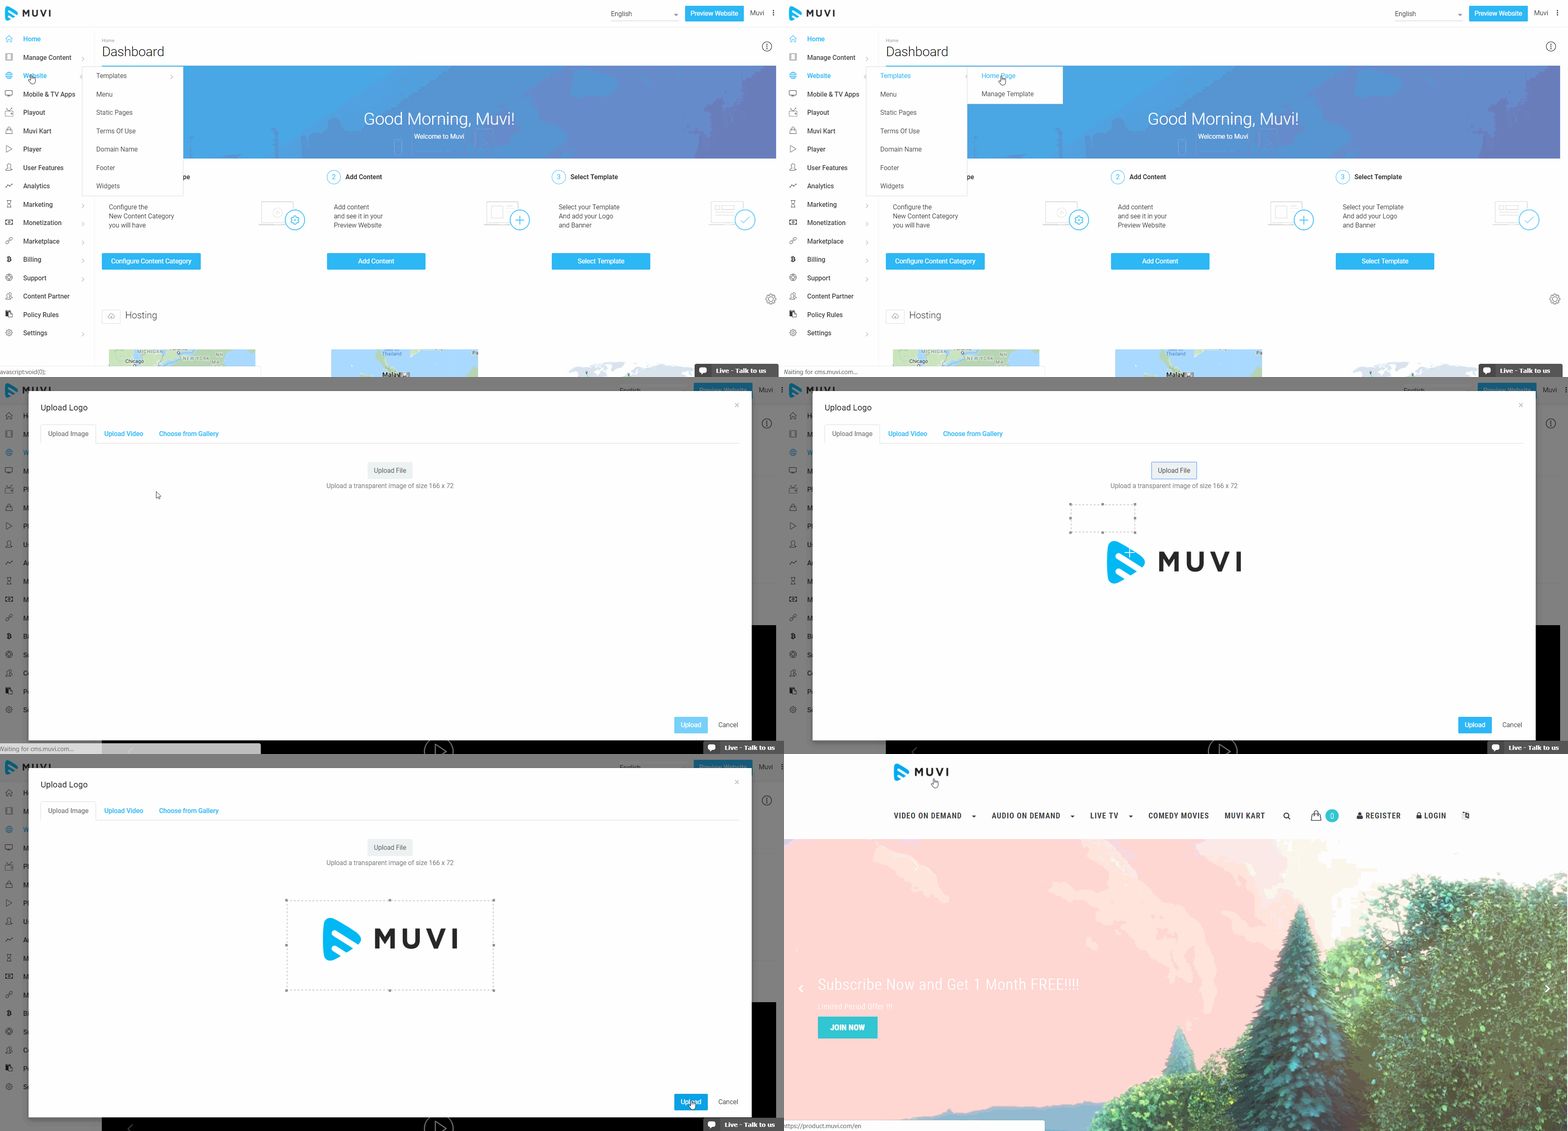
- Go to “Website” --> “Templates” -->”Homepage” in your CMS.
- Under Homepage, on the right hand side of ‘Logo” click on “Browse”.
- When you click on “Browse” a new page will open with 2 options. 1. “Upload Image” 2. “Choose from Library”.
- Select the image as per your preference and then click on “Upload”. (You can upload .jpeg, .gif, .png and. svg images. However, if you are uploading. svg images then you will not able the crop the image and few old browsers do not support this image format)
- Go to your Homepage to see how your Logo appears.
Note: To add a GIF animated logo please Click Here
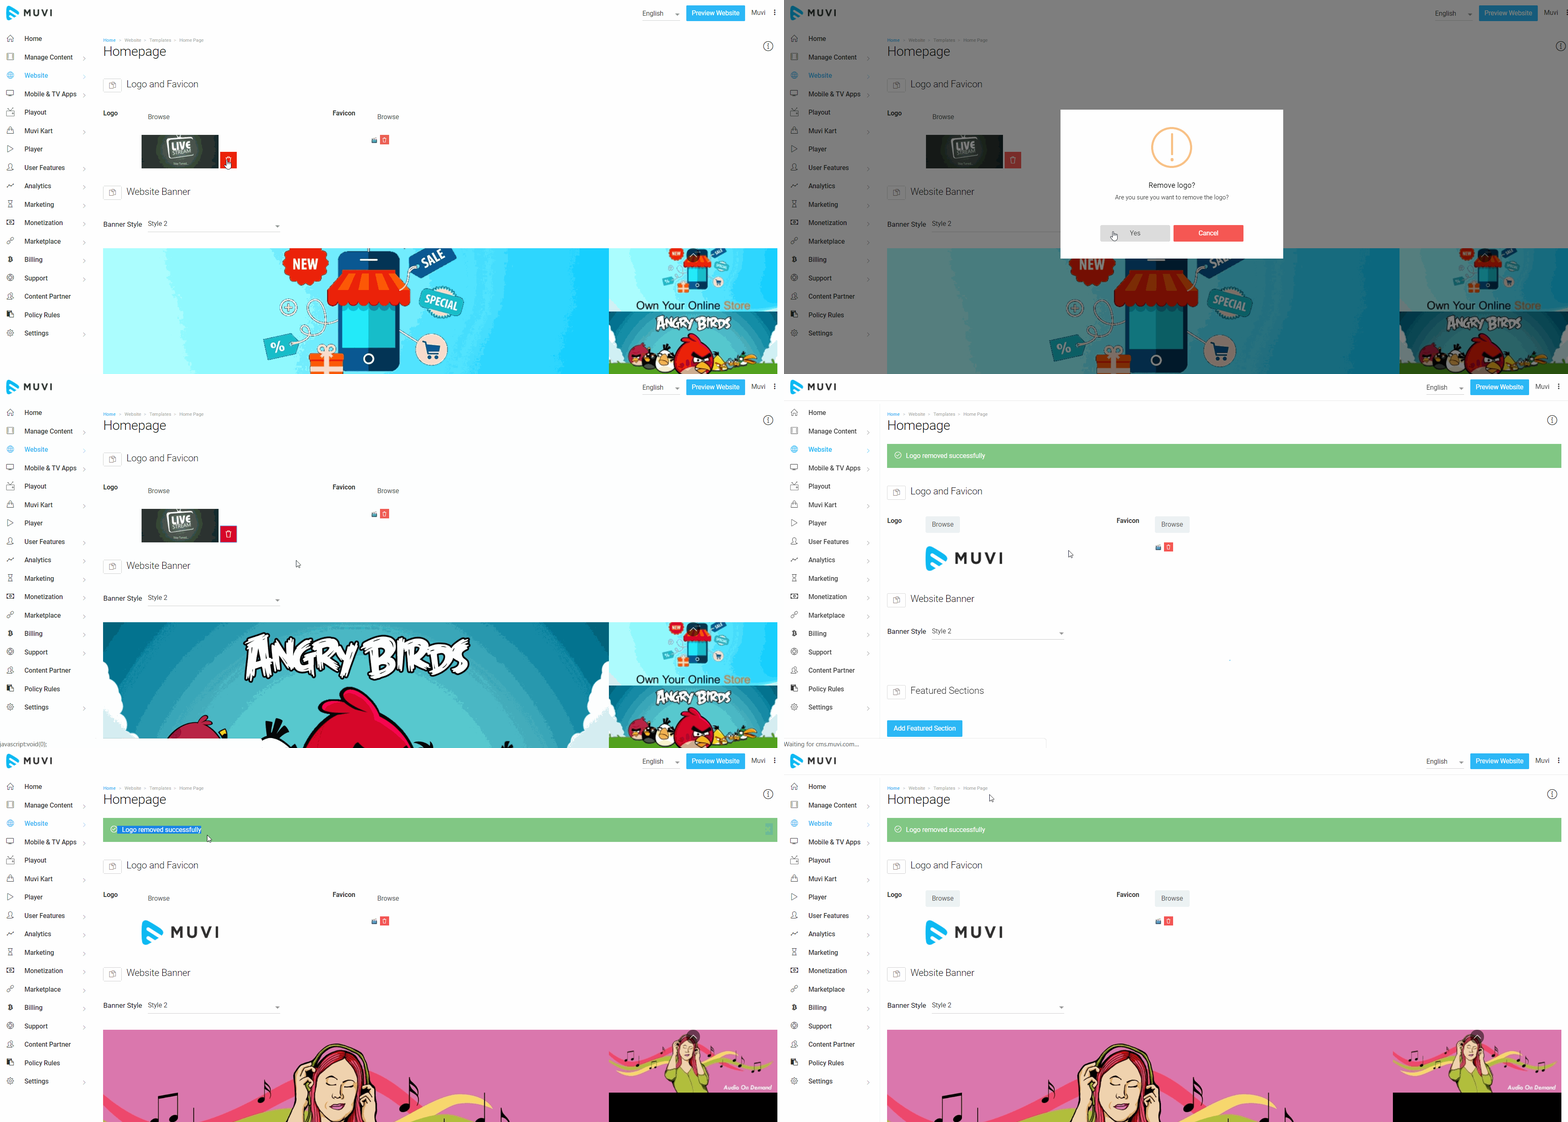
You can also remove the logo as per your requirement. Once you removed the logo, the default logo will appear in it's place.
- To remove the logo, click on the red trashcan icon.
- When asked for confirmation, click on "Yes" to remove the logo.
- The logo will be removed and the default logo will appear in it's place
Adding/Changing Favicon
- To add/change Favicon, under Homepage, go to “Website” --> “Templates” -->”Homepage” in your CMS.
- click on “Browse” on the right hand side of ‘Favicon”.
- You will get popup with options “Upload Image”, “Choose from Library”.
- Select the image from your preferred location (Computer/Image Library) and then click on “Upload”. (You can upload .jpeg, .gif, .png and. svg images. However, if you are uploading. svg images then you will not able the crop the image and few old browsers do not support this image format)
- Click on the “Preview Website” button to see how the Favicon appears on your Homepage.
You can also remove the favicon as per your requirement. Once you removed the favicon, the default icon will appear in it's place.
- To remove the favicon, click on the red trashcan icon.
- When asked for confirmation, click on "Yes" to remove the logo.
- Once the favicon is removed, the default icon will appear in it's place.
How to Add & Re-arrange Banner
Selecting Banner Style
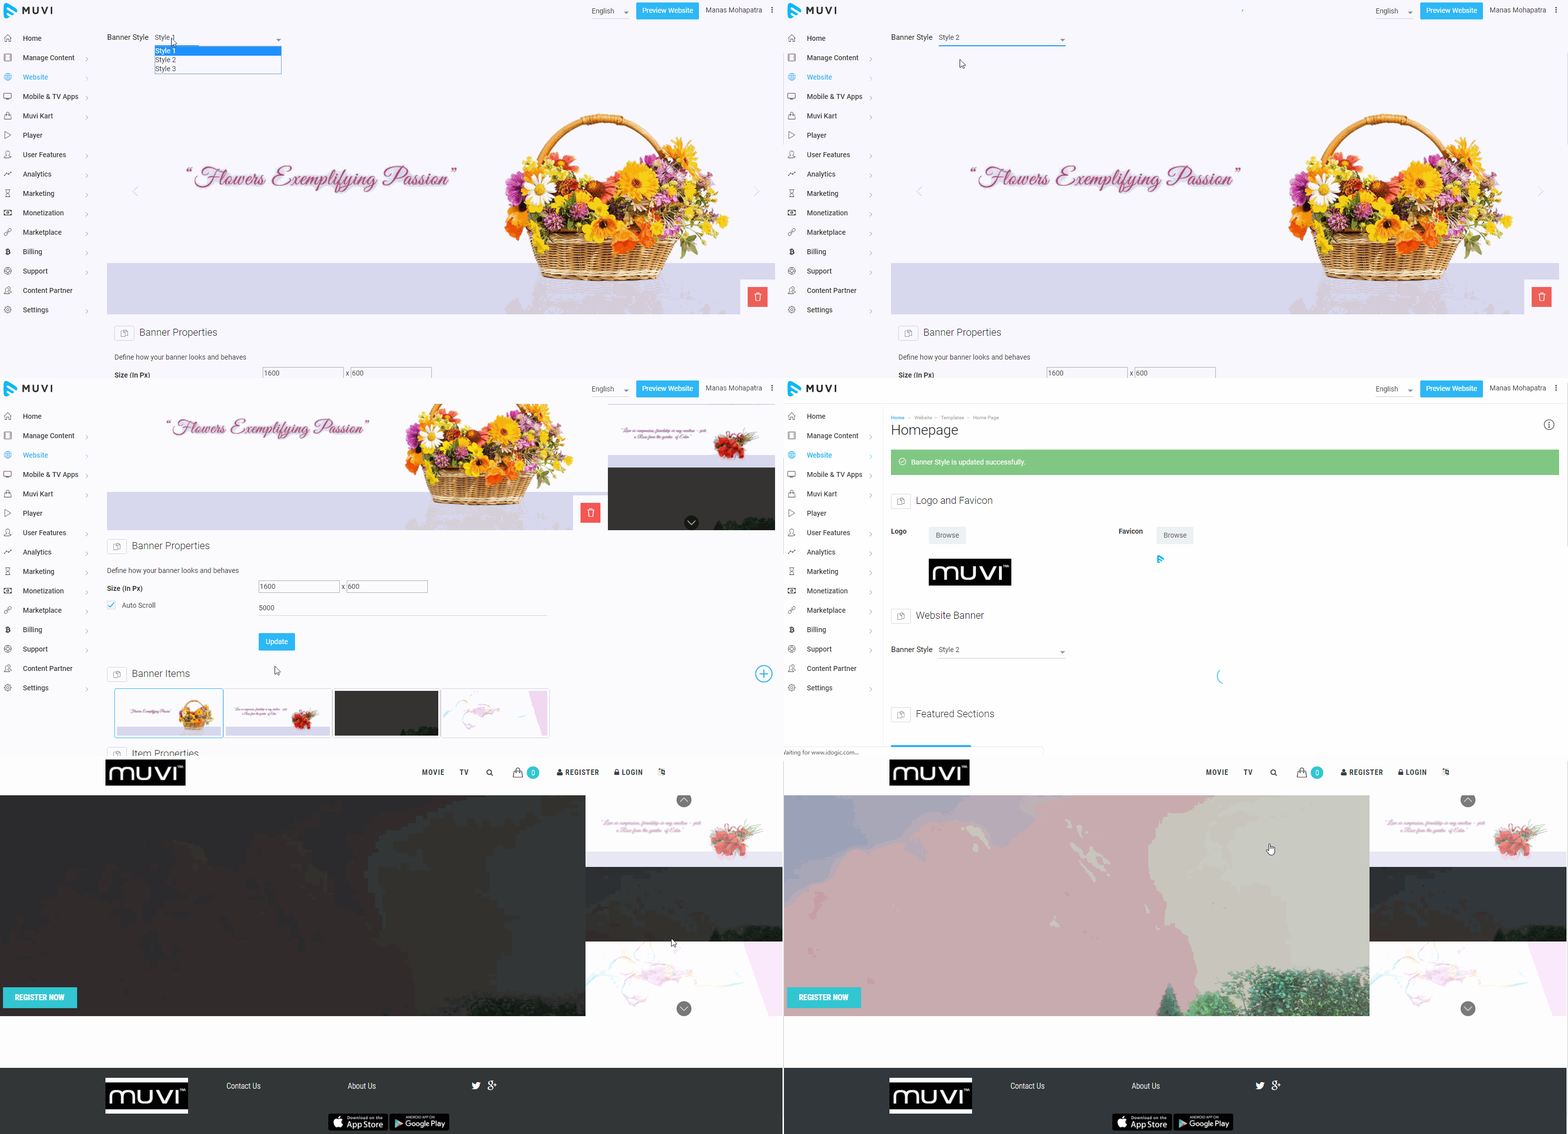
We have 3 types of banner style.
- Select your style from the drop-down list.
- Click on "Update" to save your banner style.
- Click on "Preview Website" to view the banner style on your website
Note: You can change banner style only for Classic, Modern and Traditional Template. Currently, this feature is not available for Physical Only template. Only our new customers can view this feature on their CMS ("Website"-->"Template"-->"Home Page"). Our existing customers need to add a support ticket to avail this feature.
Setting Banner Properties
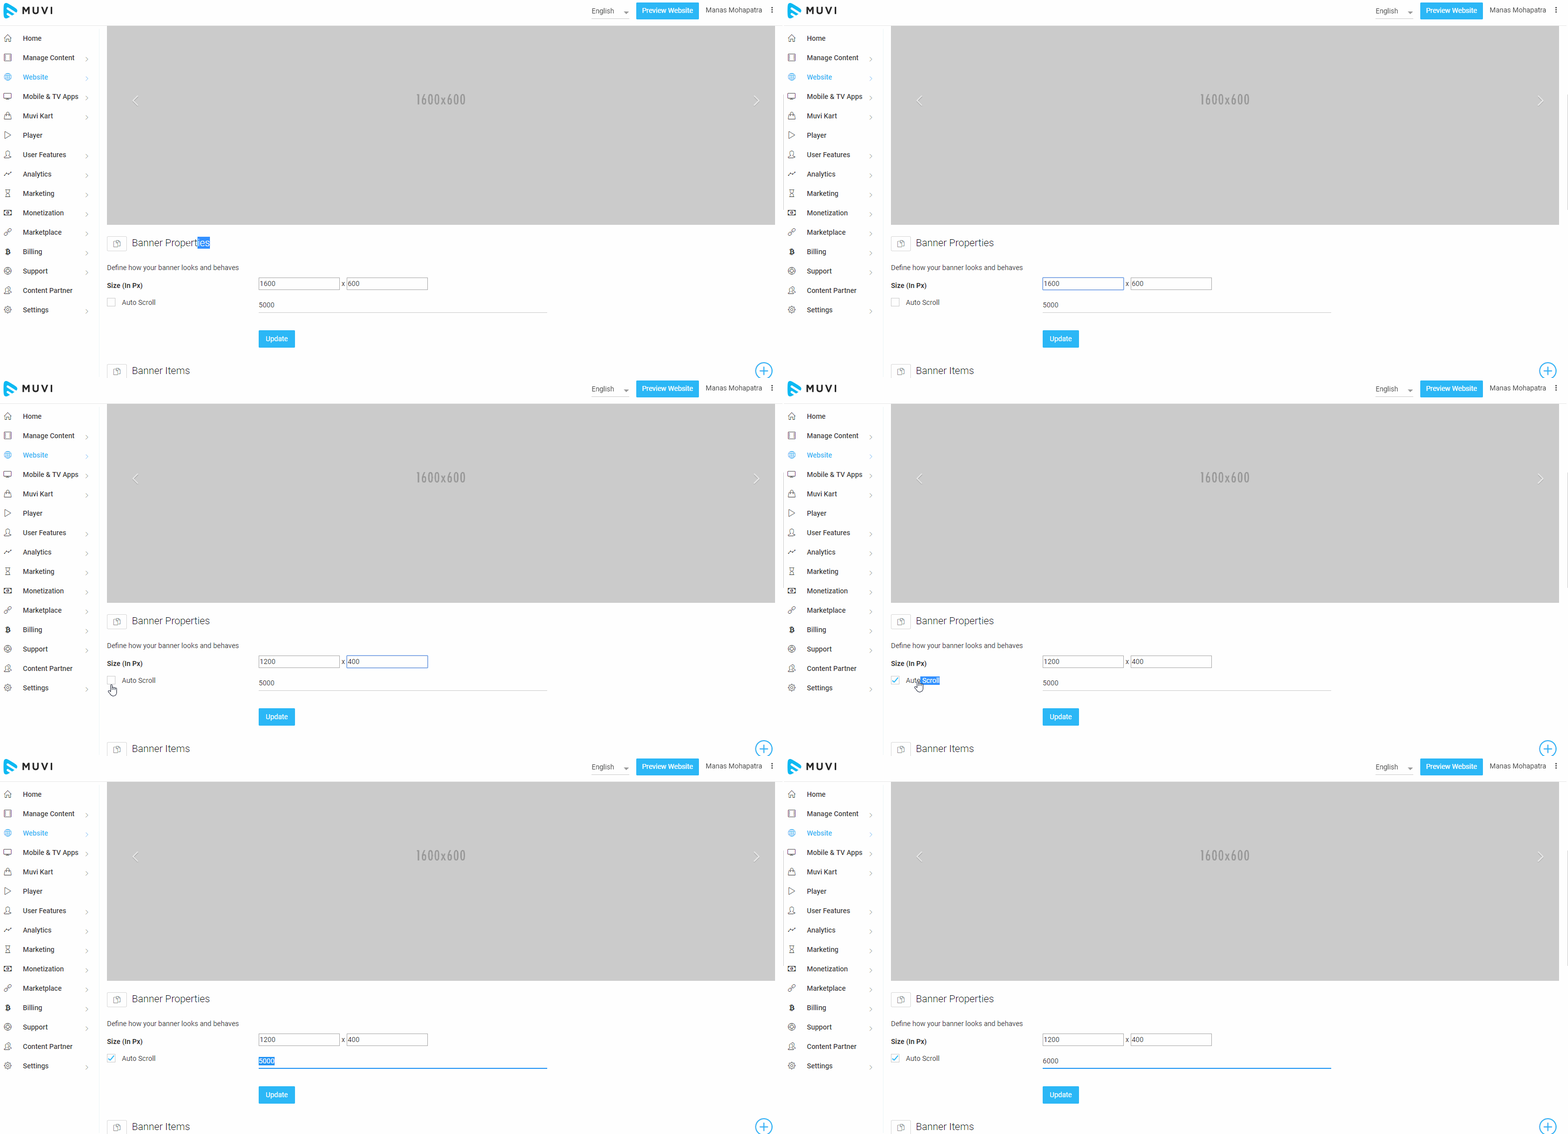
After selecting your banner style, you need to set the banner properties. Here you can define the "Banner Size" and set "Auto Scroll" timing (Carousel Speed) .
- In the "Size" filed define the banner width and height in pixel
- Select the check box for "Auto Scroll" (Carousel Speed), if you want your banners to scroll automatically. Here you can define the scrolling time in milliseconds. You can increase or decrease the scrolling time for banners as per your requirement.
- Finally, click on "Update"
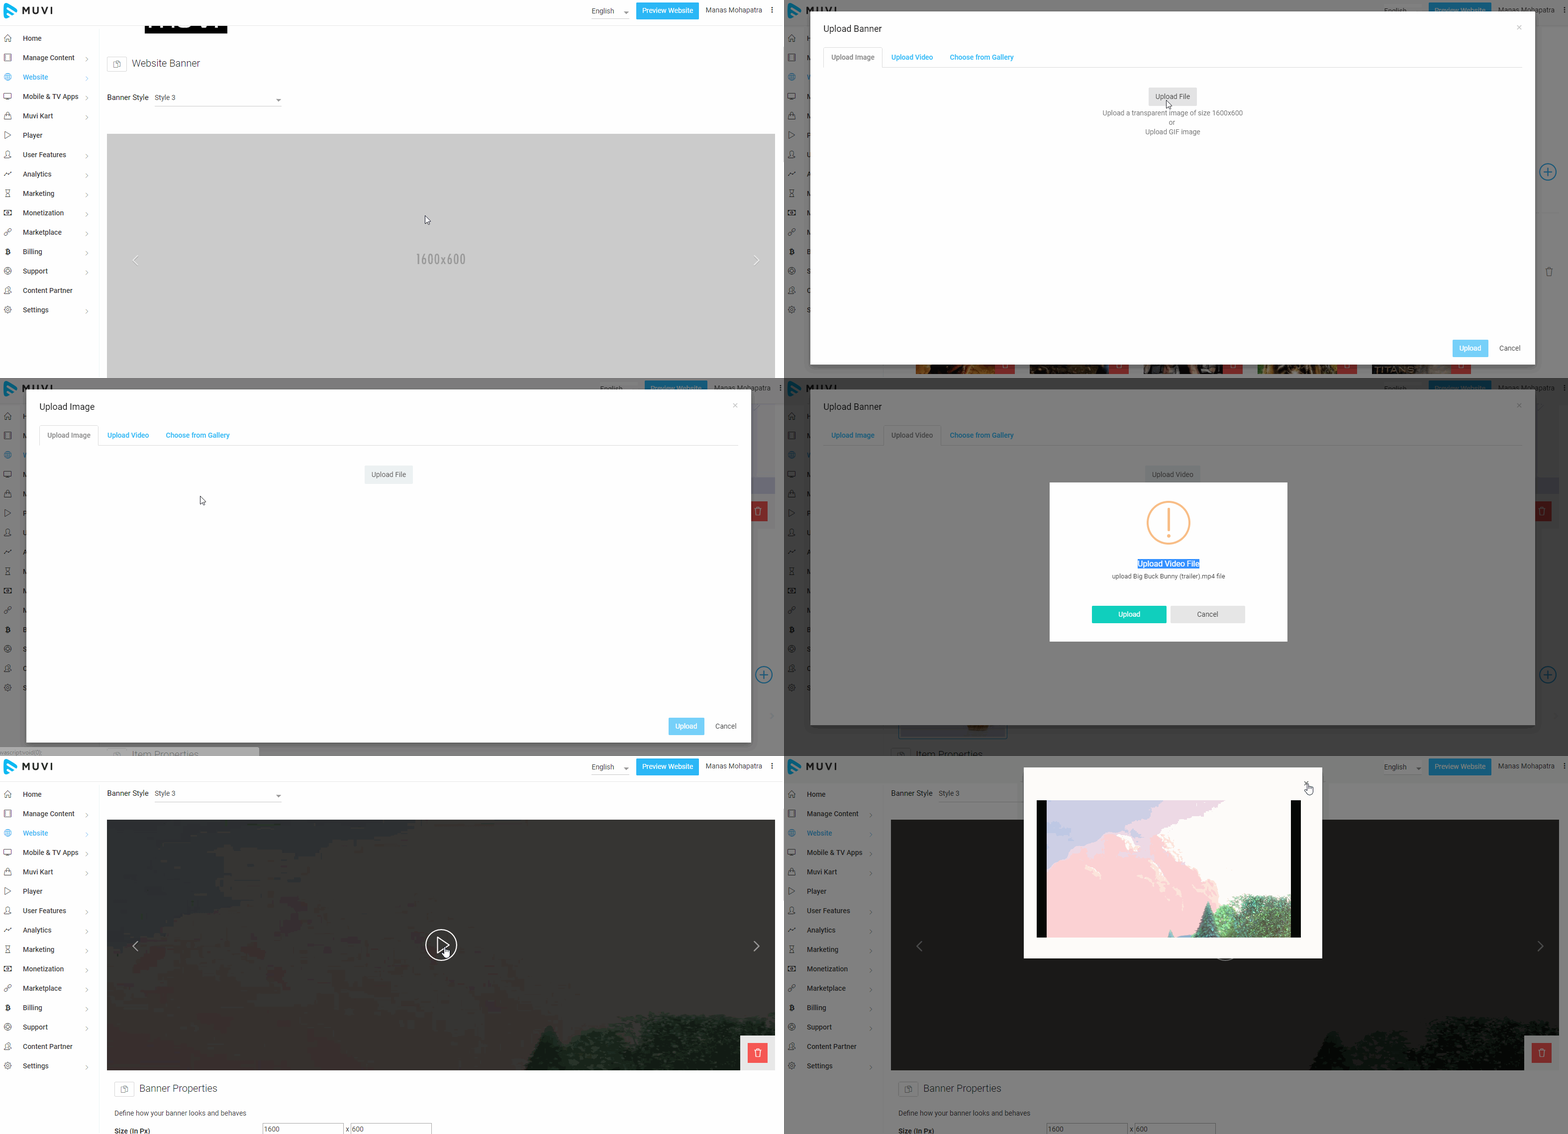
Adding Banner Images/Videos
You can use images as well as videos as banner (You can upload jpeg, .gif, .png and. svg images. However, if you are uploading. svg images then you will not able the crop the image and few old browsers do not support this image format) . For video banners, you need to upload 50 MB of MP4 videos as banners. You can add as many banners as you want.
- To add banner, click on "+" icon on the extreme right-hand corner
- Select images/videos as per your requirement and click on "Upload"
- The banner image/video will be uploaded
Re-arranging the Banners
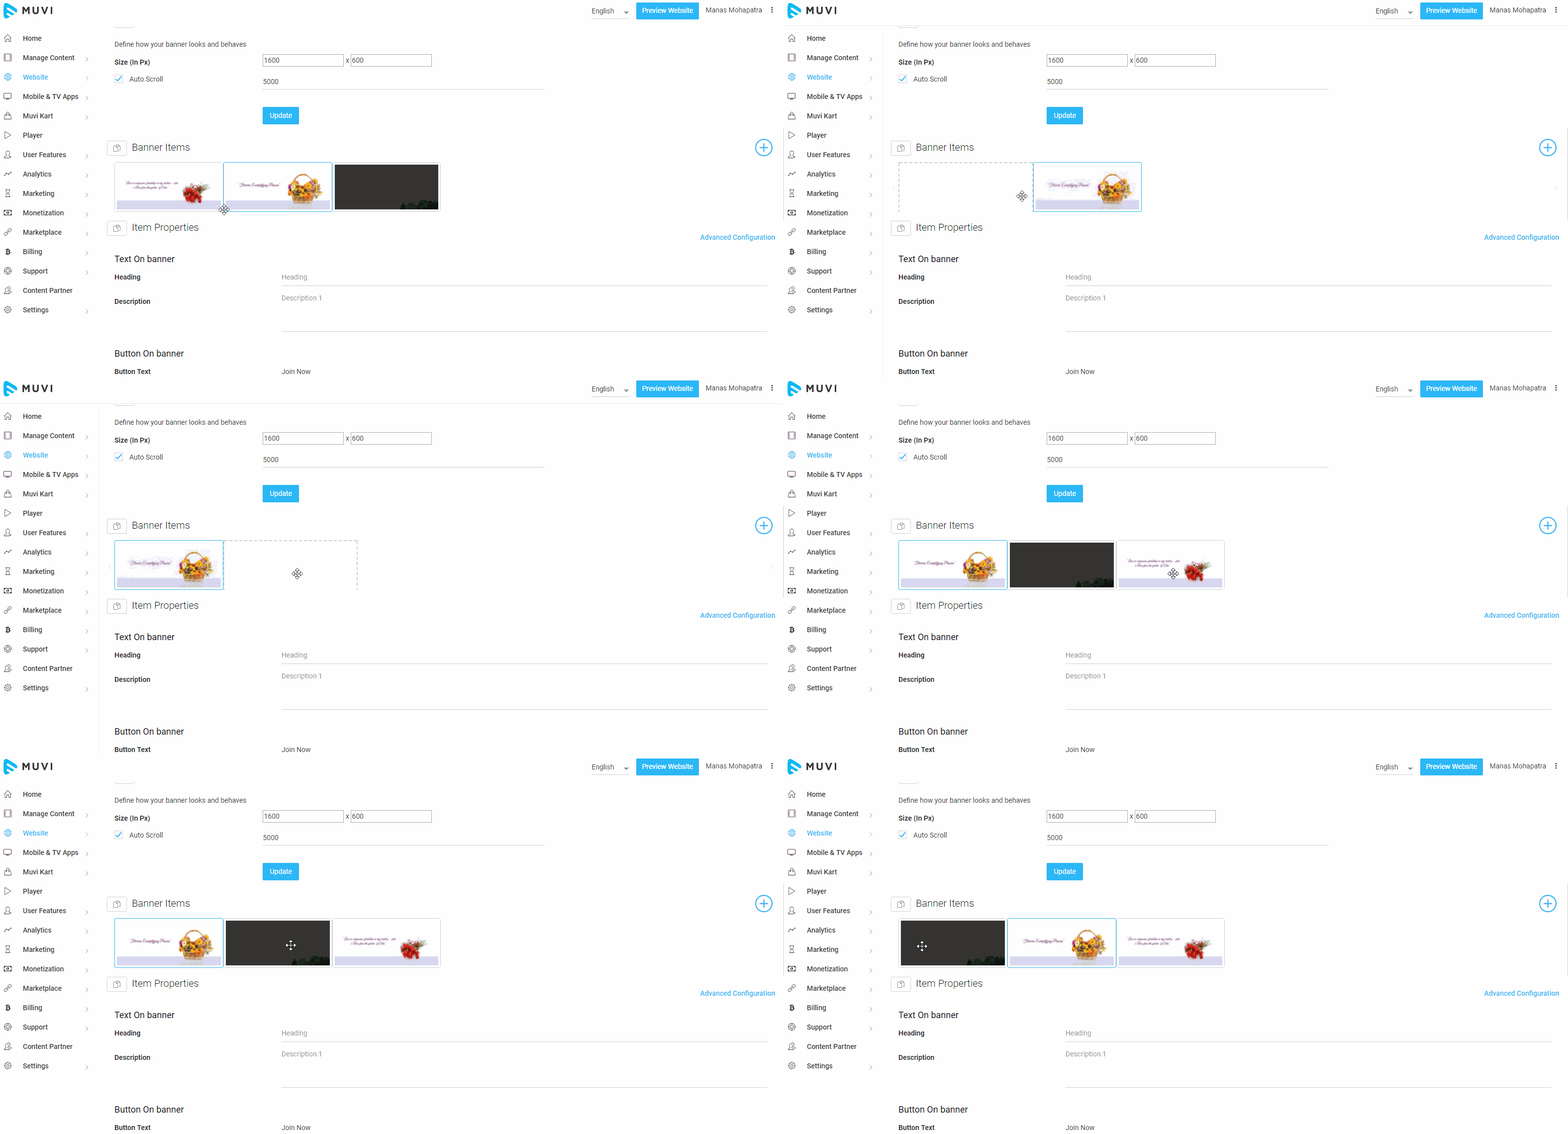
Once you add the banners to your website they will appear randomly on your homepage. If you wish to re-arrange the banners in a particular order, then simply you need to drag and drop the banner. Click on a banner and drag it to the desired place while pressing your left mouse button and then release the mouse button.
Deleting Banner
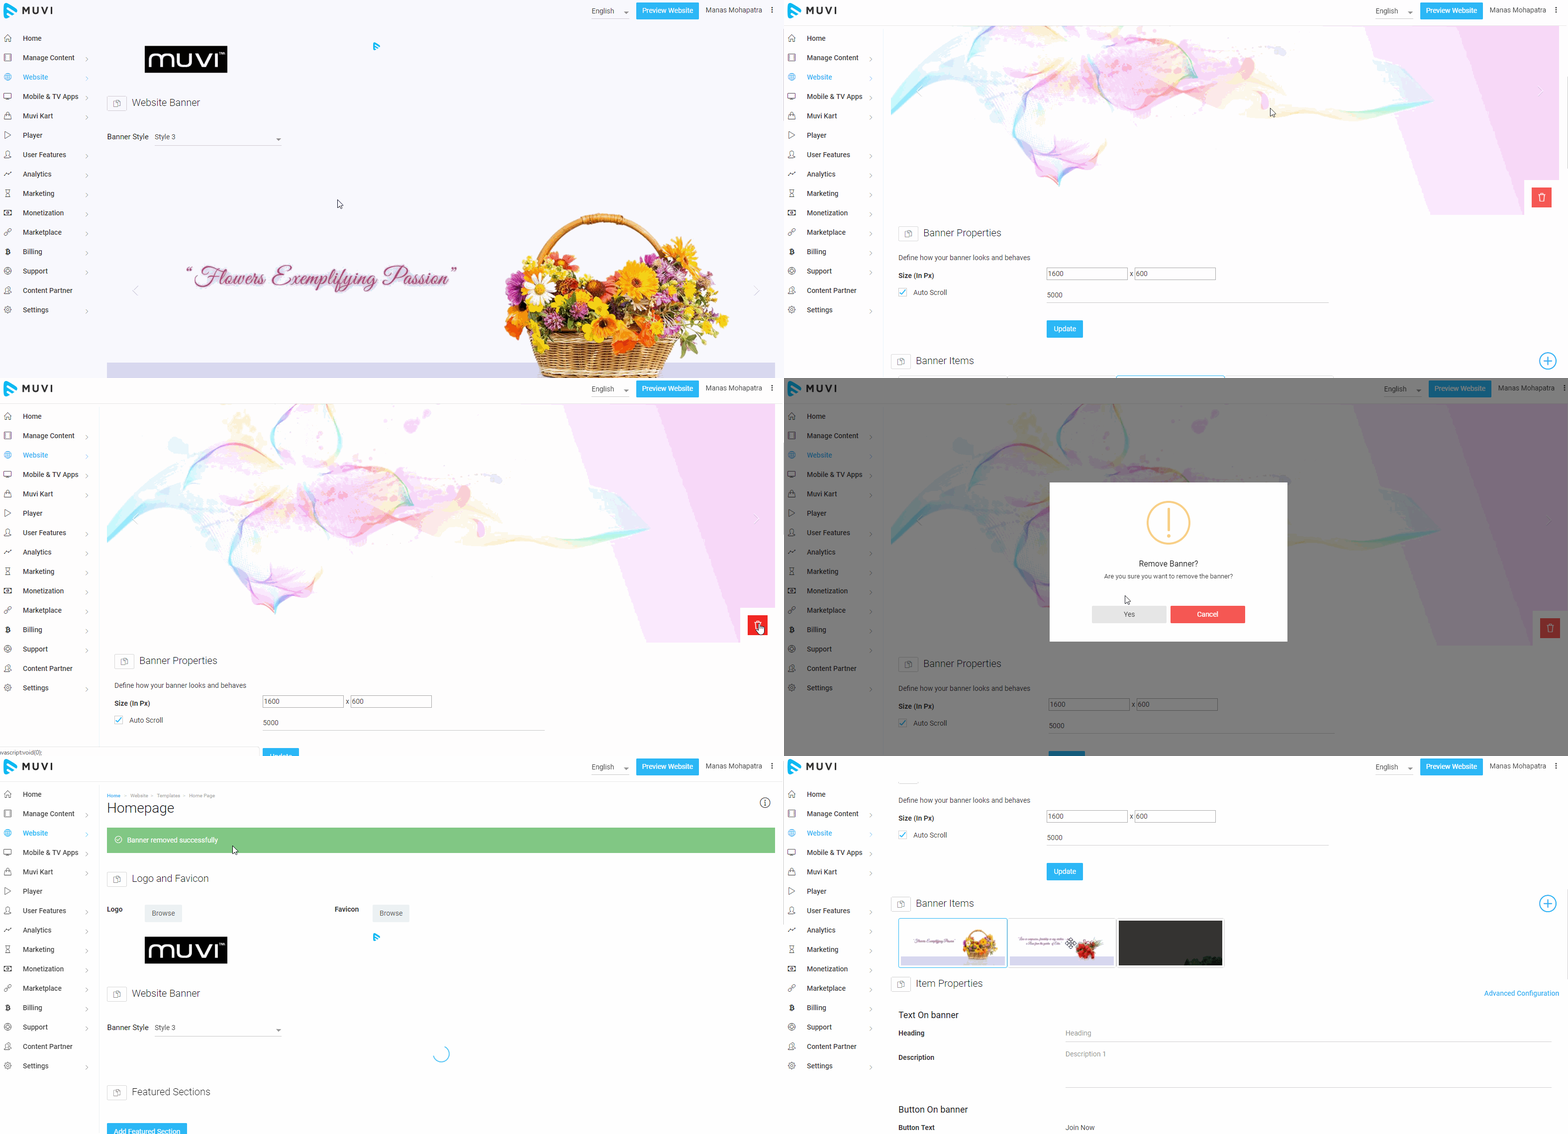
You can delete any banner from the banner list. Once you delete the image banner, the banner will be deleted from your banner list but will be available in image library. However, if you will delete any video banner, you need to upload it again from your computer to add it again to the banner list.
- To delete any banner (image/Video) from the banner list, click on the specific banner.
- Then, click on the "Trashcan Icon" on the extreme bottom right corner of that banner
- When asked for confirmation, click on "Yes" to delete the banner
- The banner will be deleted form the banner list
Adding Text on Banner
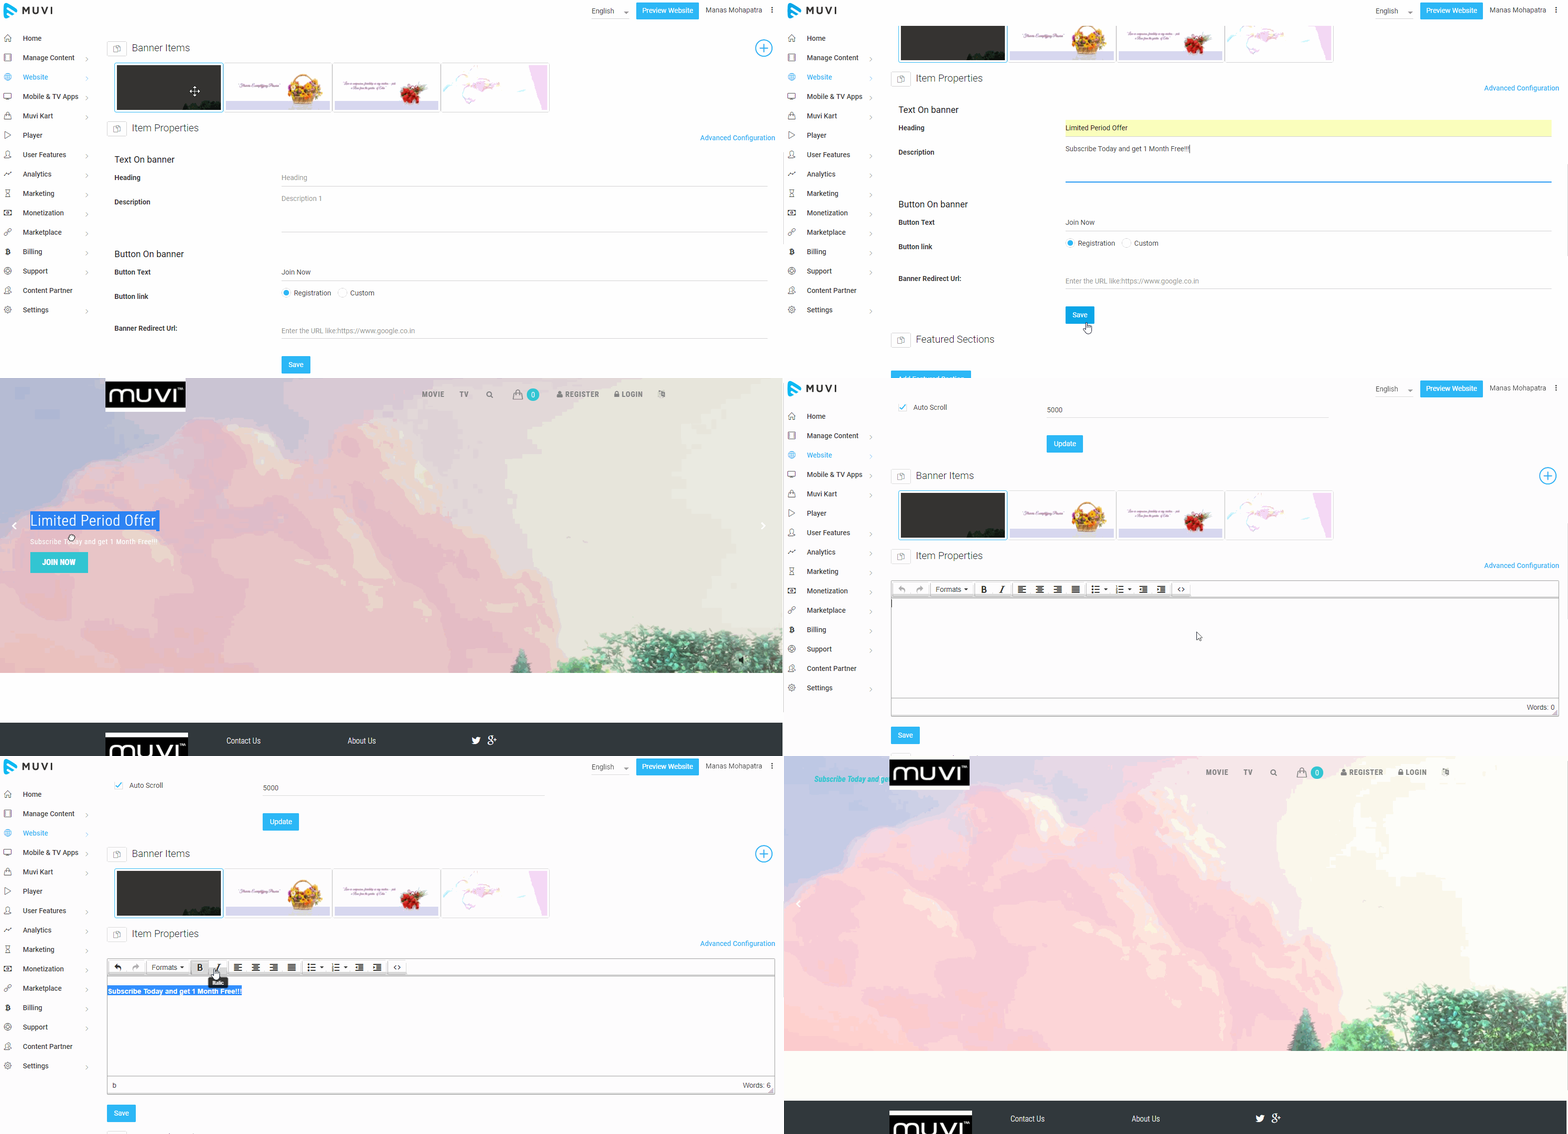
You can add text to any banner. This may be about your upcoming content, about any kind of promotion or advertisement about your website. You can add different texts to different banners including the video banners. There are two methods available to add text to banners. You can use the standard option or you can use the Advanced Configuration.
Adding text using the standard option.
- To add add text to any banner, first click on the banner to select it
- In the "Heading" field type the heading of your message (For example, Limited Period Offer, Hurry Up)
- In the "Description" field, type the description of your message (For example, Subscribe Today and Get 1 Month Free)
- Finally, click on "Save"
The text will be saved for that specific banner. To add text to other banners, please repeat the process.
Adding text using "Advanced Configuration"
- Under "Item Properties" click on "Advanced Configuration" on the extreme right-hand corner.
- Type the text in the text field. You can format the text as per your wish.
- Finally, click on "Save"
Adding Banner Text in Multiple Languages
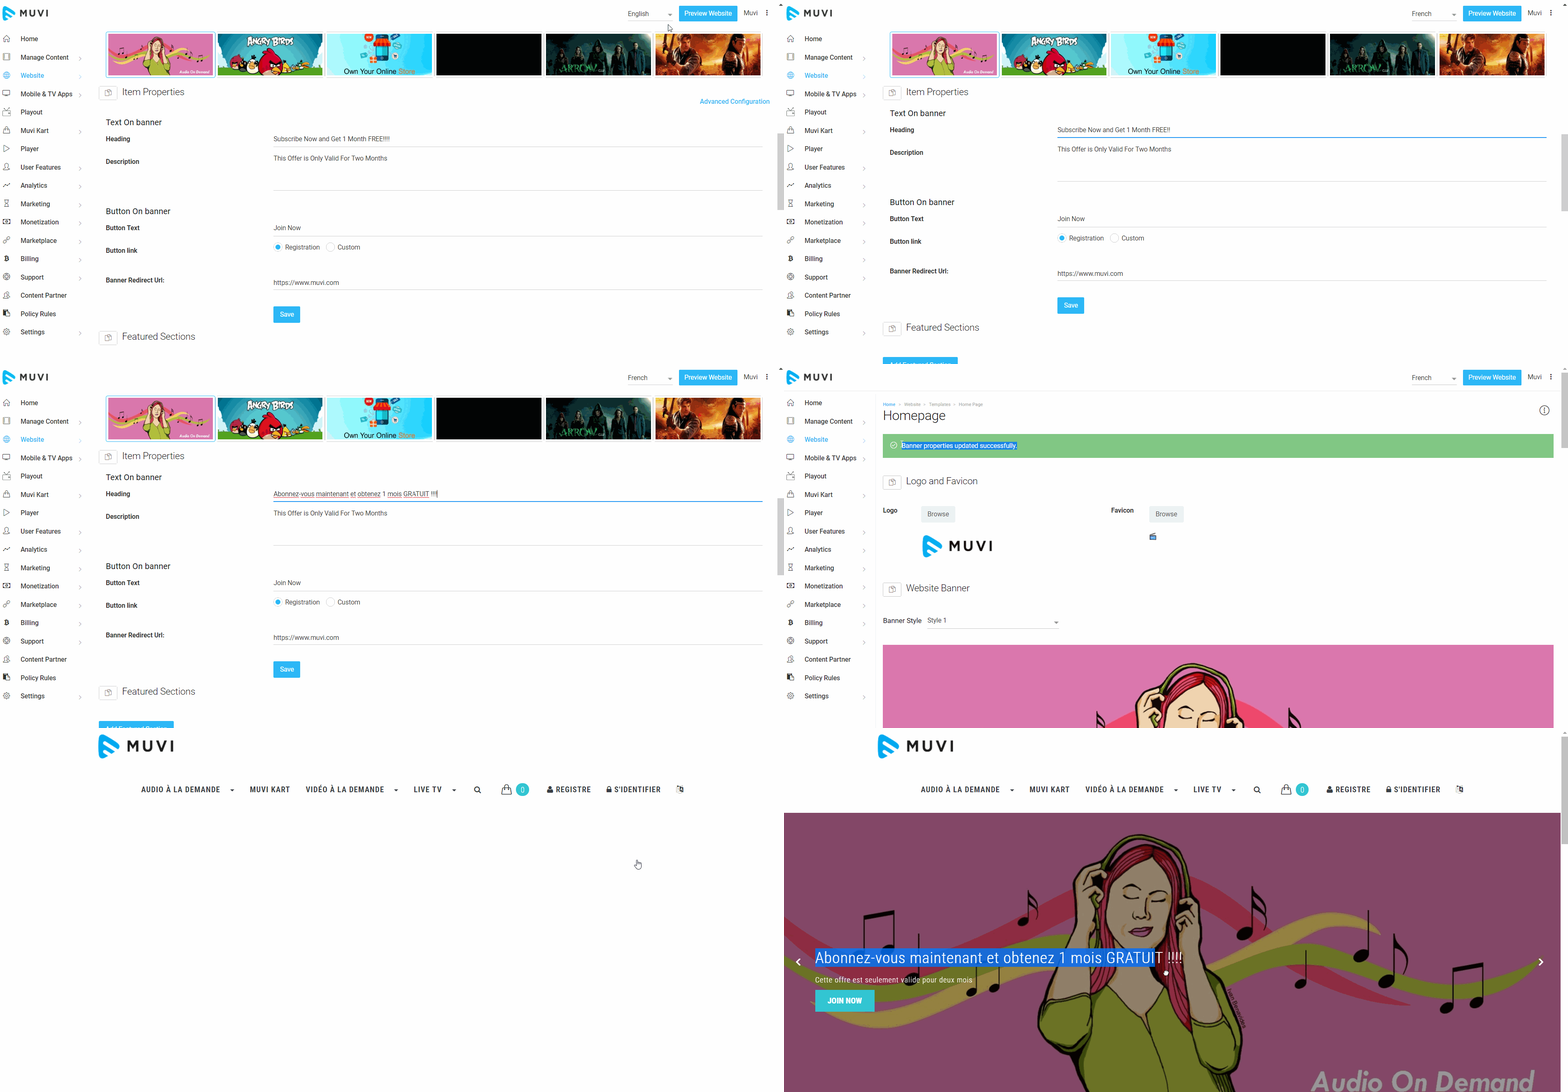
You can add banner text in multiple languages. When your users select their preferred language in your website/app, they will see the banner text in that language.
- To add banner text in different language, select the language from the drop-down
- Type the banner text in the selected language
- Click on "Save"
- When users select their preferred language from the drop-down of your website/app, they will see the banner text in that language.
Show Button on Banner
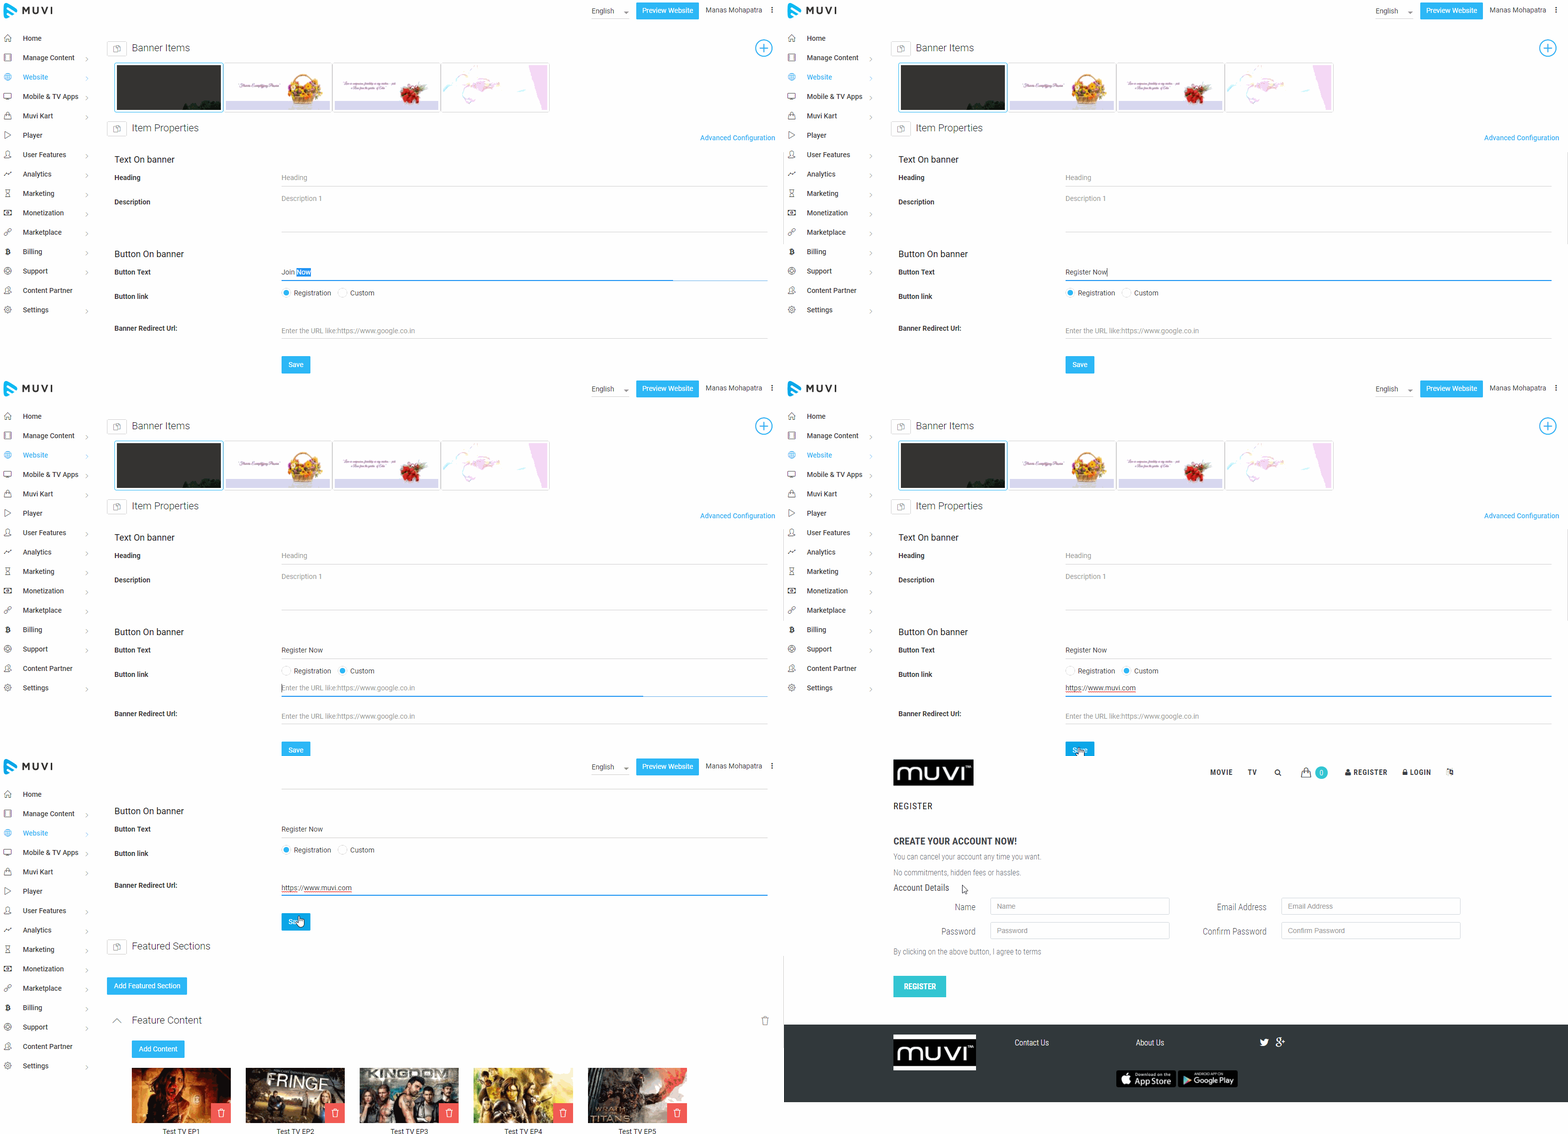
On the banner, you can add a button to the registration page or to any other page as per your wish. When a user clicks on that button, he/she will redirects to the registration page or any other page.
- By default, the button name is "Join Now"* and it is hyperlinked to the Registration page. You can change the button name as per your wish.
- To change the button link select "Custom"
- Type the URL of the page and click on "Save"
- When any user clicks on the button, he/she will be redirected to that specific page
Note: The *"Join Now" button will not be displayed to the end-users once they logged in to the store.
Adding Banner Re-direct URL
You can add any URL to any of the banner. When a user click on the banner he/she will be redirected to that specific website/page
- First, click on the banner to select it
- Type the URL on the text bar
- Click on "Save"
Repeat the process for each banner. You can set different URL for different banner.
Home Page Layout
If you have activated the "Physical Only" template for your website, then you will see a section "Home Page Layout". Here you can select "Featured Sections" or "All Product Listing" from the list.
- If you choose "All Product Listing" then all the products on your website will be displayed as a list on your home page.
- If you select "Featured Section" then you can categorize the products into different groups. For example, Upcoming Products, Summer collections, Newly Arrived, etc.
- After selecting the option from the drop-down menu click on "Save".
Adding/Editing Featured Sections
In the feature section, you can either manually add content that you want to show on your homepage or you can select the auto-generated option. For digital content, it will show the latest released movies or most-watched movies. For physical goods, it will display the goods that are in discount or show the new goods added to your website, etc.
Adding Manually Generated Featured Section
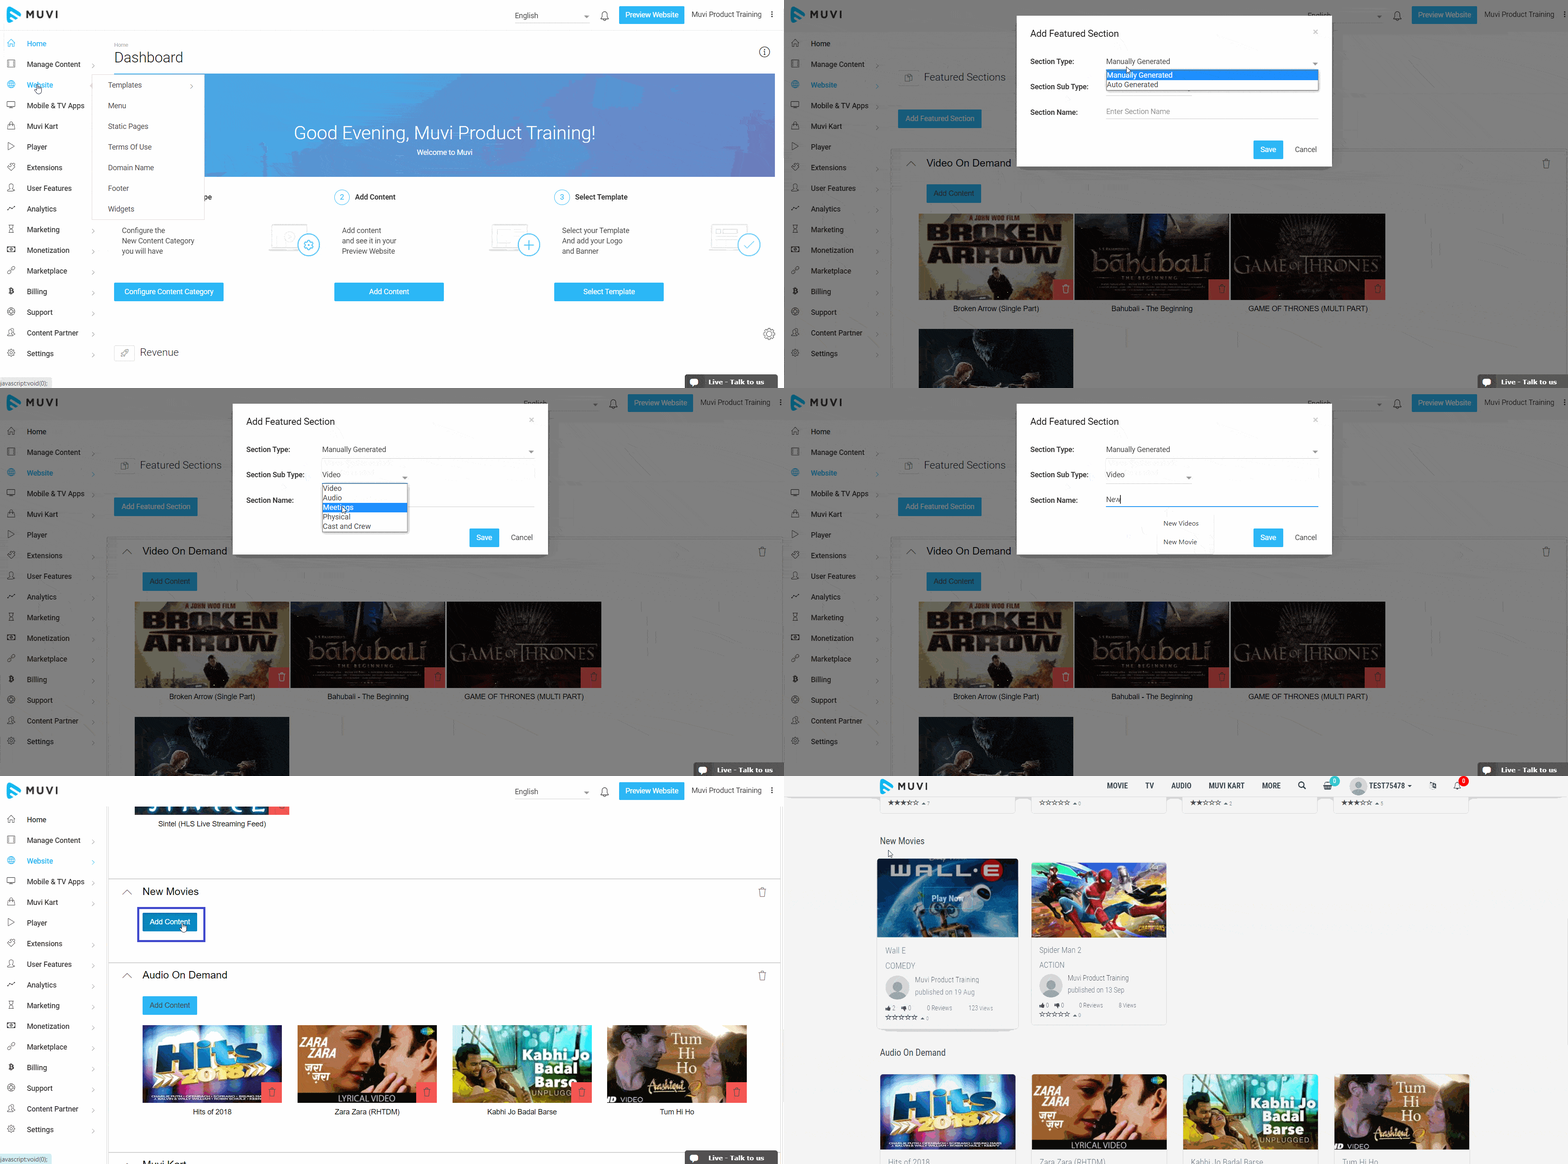
- Under Featured Sections click on “Add Featured Section”.
- A window will pop up. In "Selection Type", select "Manually Generated".
- In "Section Sub-Type", select the type of content you want to show. i.e., "Video", "Audio", "Meetings", "Physical", or *"Cast and Crew".
- Type a name for the featured section. (For example, Most Viewed, New Releases, etc.)
- Click on "Save".
- Now you can add content to the particular featured section, simply click on “Add Content” (If you have selected Manually Generated Content) then you need to add content manually)
- Once you click on “Add Content” a window will pop up where you have to type the name of the movie (Or you can enter the name of the physical good) that you want to display on that featured section.
- Then click on “Save”. This way you can add multiple contents.
- Click on the “Preview Website” button to see how your Featured Content looks on your Homepage. (If you are unable to see the changes you have made to the Featured Content section, then you need to Clear the Website Cache to view the changes or wait for 10 minutes to let the cache clear automatically).
Note:
|
Adding Auto-Generated Featured Content Section
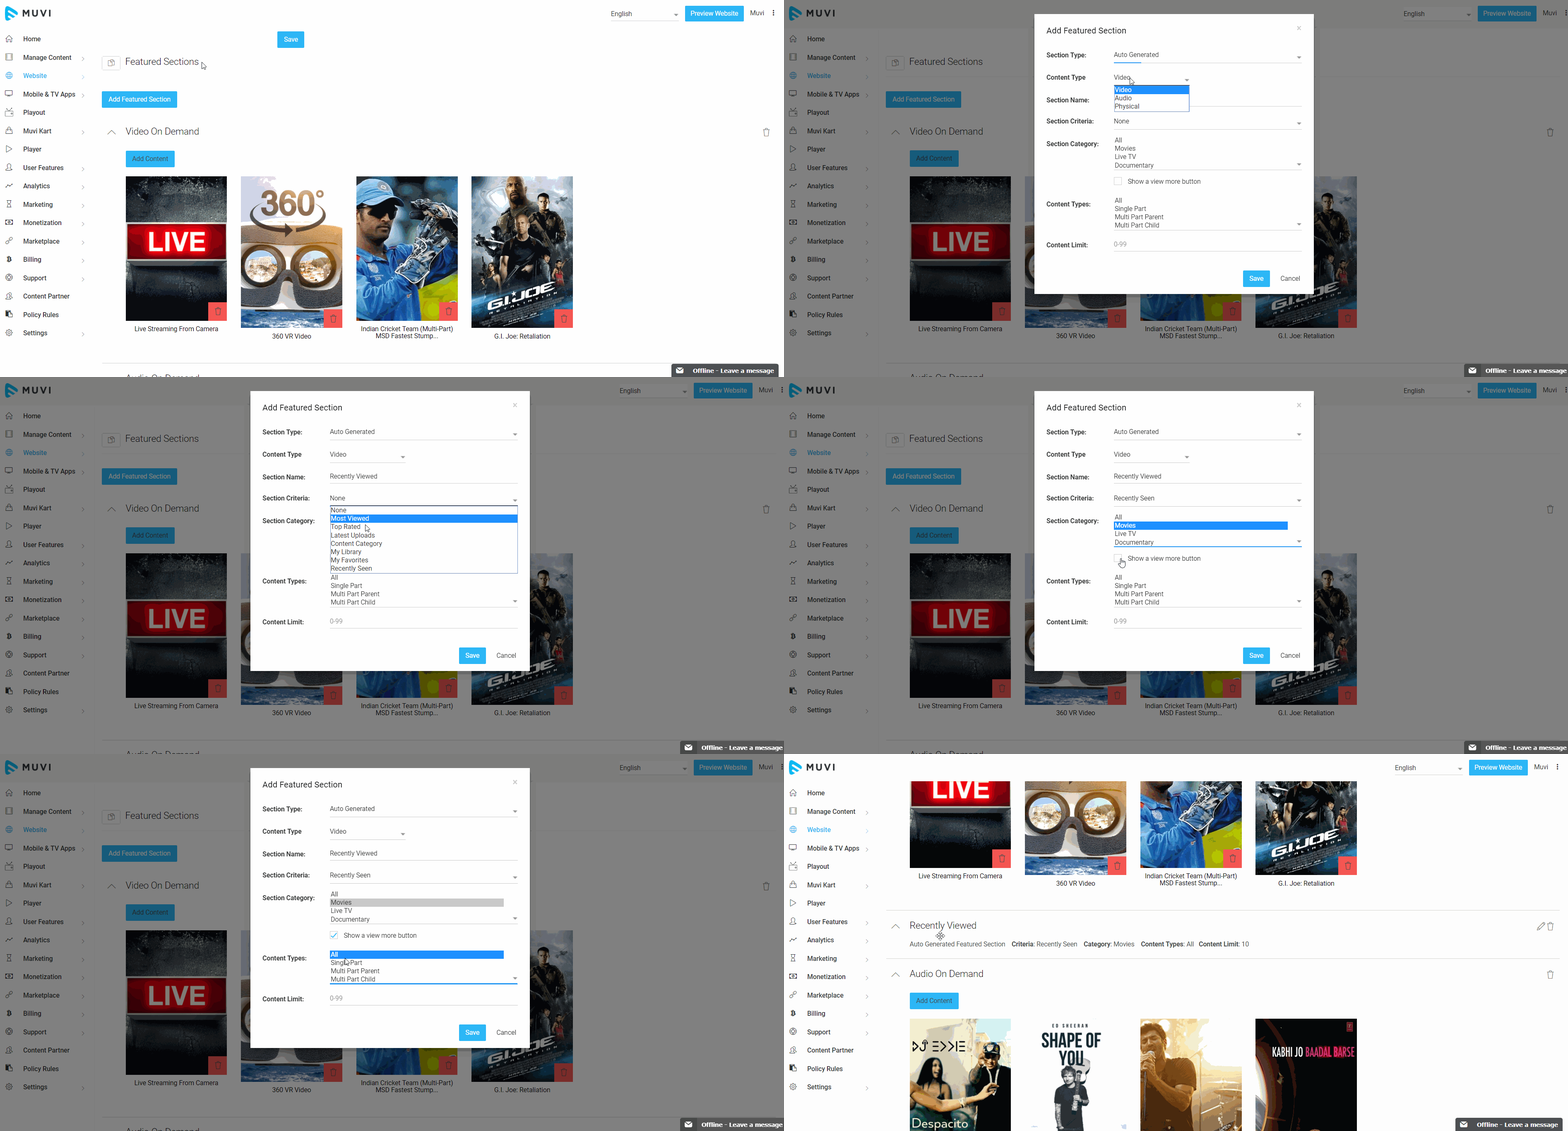
- Under Featured Sections click on “Add Featured Section”
- A window will pop up. In "Selection Type", select "Auto-Generated"
- Type a Name for the featured section. (For example, Most Viewed, New Releases, etc.)
- Select the "Section Criteria" from the drop-down list.
- If you select "Most Viewed", then all the most viewed content by your end-users will be listed automatically in the featured section. (Based on your selection in Section Category and Content Types)
- If "Top-Rated" is selected, all top-rated content in your store will be listed.
- If you select "Latest Uploads", all the content that is recently uploaded will be listed.
- If "Content Category" is selected and you have selected a category from the "Section Category", then all the content in that category (Section Category) will be listed.
- If you select "My Library", then all the content in the My Library will be listed (Based on your selection in SectionCategory and Content Types)
- If "My Favorite" is selected, then all the content on the end user's My Favorite page will be listed.
- If "Release Date" is selected. the content will be displayed (from lastest to the oldest) according to the release date added to them while creating.
- If you select "Recently Seen", then the content which is recently seen by the user will be listed.
- Select the "Section Category" from the list. (You can select multiple categories by pressing the CTRL key)
- Select the "Content Types" from the drop-down (i.e. Single Part, Multi-Part, etc. You can select multiple categories by pressing the CTRL key)
- Select "Show a View More Button" if you want to show the "View More" button. When users click on the "View More" button, they can view all the content of a specific category.
- Type the Content Limit. (The number of content you want to show on your homepage. i.e. 2, 4, 5 etc.)
- To complete adding the auto-generated feature section, click on "Save".
Additional Features in Featured Section
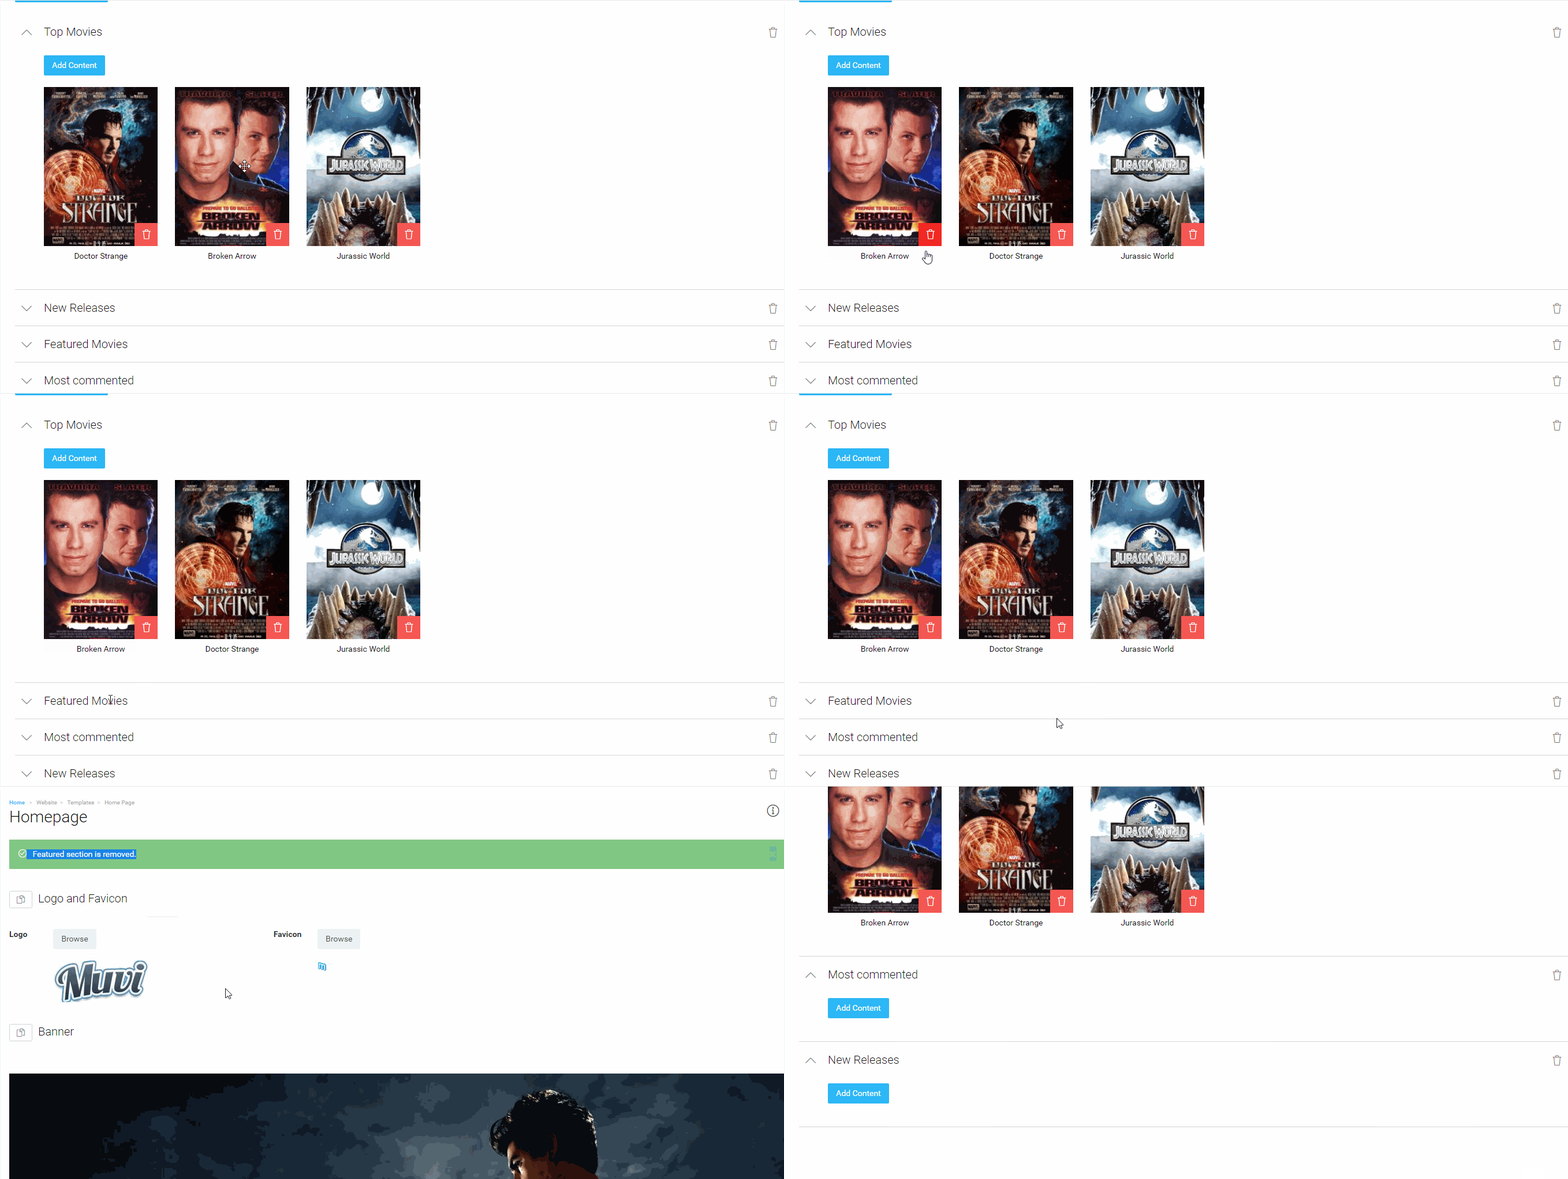
In the featured Section, there are more customizing options available. For example, you can shift the Feature Content to left or right depending on your preference. In order to change the position of the particular content you just need to drag the content and place it where you want. Likewise, you can also change the Feature Content section. You can simply drag and drop the sections at the position you want. To delete a particular feature section, simply click on the trashcan icon.
Let us know so that we can improve.

February 24
12:00AM PST
Introducing TrueComply: Scaling Video Compliance with AI Automation
Video compliance has always been a critical requirement for broadcasters—and today, OTT platforms, streaming services, and enterprise video teams face the same challenge at a much larger scale.…...
Event Language: English

