Getting Started with E-Learning
Product: Muvi OneIntroduction
Muvi One’s E-Learning Module helps you to develop an end-to-end E-Learning or training platform with courses, quizzes, and course completion certificates. It can be used by enterprises, corporations, educational institutions, and individual instructors to develop their own training platforms, through which they can deliver online and distance learning courses and certifications. Easily create course content in the form of either recorded or live videos, or audio lessons, downloadable in the form of PDF files.
Create multi-level courses with each course divided into multiple chapters and each chapter divided into multiple lessons. Insert quizzes in the middle of the chapters and/or lessons to track your learner’s progress. At the end of the course completion, you can provide their certificate of completion.
How to Activate E-Learning
First, you need to activate the E-Learning module from the Muvi One CMS. This is a paid feature. You can take a 14-day Free Trial before purchasing it.
- To activate E-Learning, navigate to “Content Management” -->” Content Settings” in the CMS.
- Click on the “Advanced” tab under the Content settings.
- Enable “E-Learning”, when asked for confirmation, click on “Activate”.
- Once the E-Learning is activated, the website template will be automatically changed to “Citrien”.
- A new Nested Content Group will be created automatically for E-Learning with multiple levels like “Chapters” and “Lessons”.
- The E-Learning menu will appear in the CMS menu.

Adding Courses
You can add multi-level courses, where you can have multiple “Chapters” under a course, and under each chapter, you add multiple “Lessons”.
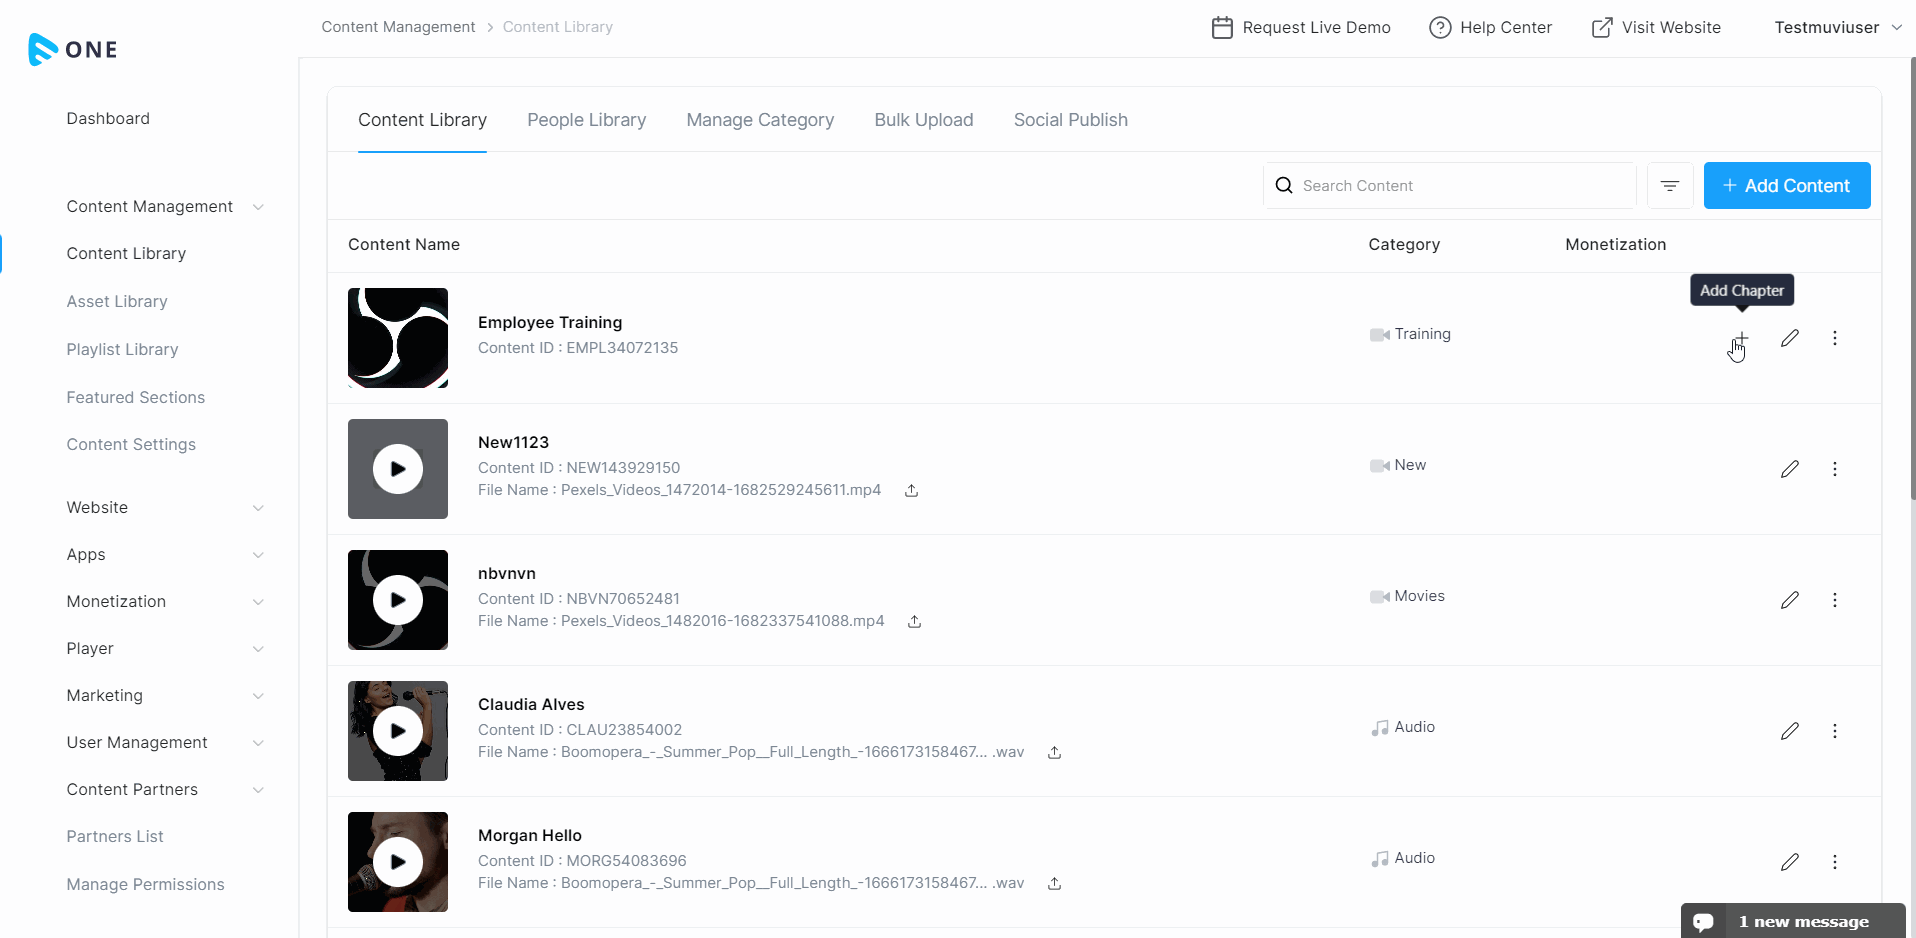
- To add the “Course”, navigate to “Content Management” -->” Content Library” in the CMS.
- Under the “Content Library” tab, click on “Add Content” on the extreme right-hand side.
- Select the “Video” from the drop-down in the “Content-Type” field.
- The content format will be selected as "Video".
- Select the "Group" name e-Learning from the drop-down.
- Type the “Course Name” (e.g., Product Training, Employee Training)
- Content “Permalink” is automatically generated. You can also edit the permalink.
- Select the “Content Category” from the drop-down. To know how to create a ‘Content Category’ click here.
- Type the “Story/Description” for the course.
- Type “Search Tags” for the course. After typing the search tags, type the comma (,). You can add multiple search tags for the content that helps search the content easily by the end-users.
- Click on "Banner" to upload a top banner for the content. Click on "Add File" to upload the banner image. You can also upload different banners for "Website", "Mobile App", TV App".
- Click on the “People” tab to add the instructor for the course.
- Select the Person Type from the drop-down. You can also create a new type by clicking on “New Type”. Search the name of the cast in the search box and click on “Add”.
- Click on "Add On", to add a file, video, or audio with the video content. Select the 'Media Type, type the "Label Name" and "Upload" the file.
- Click on “Add File” on the extreme right to upload “Thumbnail”. You can select the image from the Asset Library(if you have already uploaded it) or you can upload it directly from your device.
- Click on “Save”. The content will be saved and the encoding process for the video will be initiated on the server. After the encoding, the content can be viewed by the end users.
- To preview the content, click on “Preview”.
Adding Chapters
- To add a chapter, click on the “+” icon on the right-hand side of a “Course”.
- Type the “Content Name” (e.g., Chapter Name, Chapter 1, Chapter 2, etc.)
- Content “Permalink” is automatically generated. You can also edit the permalink.
- Type the “Story/Description” for the chapter.
- Type “Search Tags” for the content. After typing the search tags, type the comma (,). You can add multiple search tags for the content that helps search the content easily by the end-users.
- Click on "Banner" to upload a top banner for the content. Click on "Add File" to upload the banner image. You can also upload different banners for "Website", "Mobile App", TV App".
- Click on the “People” tab to add an instructor for the chapter.
- Select the Person Type from the drop-down. You can also create a new type by clicking on “New Type”. Search the name of the cast in the search box and click on “Add”.
- Click on "Add On", to add a file, video, or audio with the video content. Select the 'Media Type, type the "Label Name" and "Upload" the file.
- Click on “Add File” on the extreme right to upload “Thumbnail”. You can select the image from the Asset Library(if you have already uploaded it) or you can upload it directly from your device.
- Click on “Add Child”. The chapter will be saved.
- Once the chapter is added, you can view it in the Content Library by clicking on "Course". The course will expand, and you can view the chapter under it.
- Repeat the process to add multiple chapters.
Adding Lessons
- To add a lesson, click on the “+” icon on the right-hand side of a “Chapter”.
- Type the “Content Name” (e.g., Lesson Name, Lesson 1, Lesson 2, etc.)
- Content “Permalink” is automatically generated. You can also edit the permalink.
- Type the “Story/Description” for the lesson.
- Type “Search Tags” for the content. After typing the search tags, type the comma (,). You can add multiple search tags for the content that helps search the content easily by the end-users.
- Click on “Media” and then click on “Add File” under “Primary Media” to upload the video for the content. You can select the video from the Asset Library(if you have already uploaded it) or you can upload it directly from your device. If you will upload the video from your device, then it will be automatically saved in the “Asset Library”.
- To upload the trailer or "Preview" for the content, click on “Add File” under “Preview”. You can select the video from the Asset Library(if you have already uploaded it) or you can upload it directly from your device.
- Click on "Banner" to upload a top banner for the content. Click on "Add File" to upload the banner image. You can also upload different banners for "Website", "Mobile App", TV App".
- Click on the “People” tab to add an instructor for the lesson.
- Select the Person Type from the drop-down. You can also create a new type by clicking on “New Type”. Search the name of the cast in the search box and click on “Add”.
- Click on "Add On", to add a file, video, or audio with the video content. Select the 'Media Type, type the "Label Name" and "Upload" the file.
- Click on “Add File” on the extreme right to upload “Thumbnail”. You can select the image from the Asset Library(if you have already uploaded it) or you can upload it directly from your device.
- Click on “Add Child”. The content will be saved and the encoding process for the video will be initiated on the server. After the encoding, the content can be viewed by the end users.
- Once the lesson is added, you can view it under the "Course" -->"Chapter" in the Content Library.
- Repeat the process to add multiple lessons.

How to Add Quizzes
You can create quizzes with multiple-choice options and single-choice options to track your learner’s progress. You can even assign passing % for the quizzes. Once the quizzes are created, you can map quizzes to chapters and/or lessons.
- To add quizzes, navigate to “E-Learning”-->” Question Library” in the CMS.
- Click on “Add Question Group”.
- Type the “Question Group Title” (e.g., Product Training Questions, HR Training Questions, Physics Questions, etc.)
- Type the “Question”.
- In “Answer Type”, select “Single Choice” or “Multiple Choice”. If you select a single choice, then out of 4-5 options only one option will be the right answer. If you select multiple choice, then, out of 4-5 options users can select more than one option as the right answer.
- Type the “Answers”. You can give 4-5 options to the users from which they can select the correct answer.
- Select the right answer from the options given as answers.
- Click on “Save” to save the question group.
- Repeat the process to add multiple question groups.
- You can also edit a specific question group or delete a specific question group.
How to Map Quizzes
After creating the “Question Groups”, you can map them to any specific “Chapter” and/or “Lesson”.
- To map question groups to any specific chapter and/or lesson, navigate to “Manage Content” -->” Content Library” in the CMS.
- On the right-hand side of a specific “Course” click on the 3 dots and select “Manage Course”.
- You can see the list of chapters and lessons under the “Course Widget”.
- Click on the “Quiz” tab.
- Then, click on “Add Quiz”.
- You can either create a new quiz or select a quiz from the “Question Library”.
- To add a new quiz, follow the process mentioned in the previous section “Adding Quizzes”.
- To select an existing quiz from the “Question Library”, click on the “Select from Question Library” tab.
- Select the quiz from the left-hand side list that you want to map with the course.
- Click on “Submit”.
- Click on the “Quiz Settings” tab.
- Select “Assign Passing Grade”.
- Type the % of the passing grade (e.g., 60%, 80%, 90%, 100%, etc.) The user needs to score the mentioned passing % to pass the quiz.
- Click on “Save”.
- The quiz will be saved and parked under the chapters and lessons on the left-hand side.
- Drag the question group and drop after a chapter or lesson.
- Once the users finished watching the lessons, the quiz will appear.
- The users need to attempt the quiz and need to pass it to proceed to the next chapter/lesson.
Adding Certificate
You can add a certificate in the CMS. Once the certificate is added then you can assign it to a specific course.
- To add a certificate, navigate to “E-Learning”-->” Certificate” in the CMS.
- Click on “Add Certificate”.
- Type the “Certificate Title” (e.g., Certified Muvi CMS Administrator, Certified Java Developer, etc.)
- You can edit the default certificate by replacing its logo, text, images, etc.
- Click on the “System Variables” link at the bottom to get all the variables to use in the certificate.
- You can also access the source code of the certificate and modify the certificate according to your requirement.
- Click on “Save” to save the certificate.
- You can add multiple certificates for different courses.
- You can also "Edit" or "Delete" a certificate that you have already created.
How to Assign Certificate
You can assign the certificate to any course level, chapter level, or lesson level.
- To assign the certificate to any specific course/chapter and/or lesson, navigate to “Manage Content” -->” Content Library” in the CMS.
- On the right-hand side of a specific “Course” click on the 3 dots and select “Manage Course”.
- You can see the list of chapters and lessons under the “Course Widget”.
- Click on the “Certificates” tab.
- Click on “Add Certificate”.
- Either you can add a new certificate, or you can “Select from Certificates” that you have already created by following the steps mentioned in “Adding Certificates”.
- Click on “Save” to save the certificate. It will be displayed on the left-hand side under the chapters and lessons.
- Drag and drop the certificate under a specific chapter or lesson.
- When the users will complete the course/chapter/lesson they will get the certificate.

View Your E-Learning Website
Finally, after adding the course, chapters, lessons, quizzes, and certificates, you can view your E-Learning website. Check how everything appears on the website. You can also customize your website template using the Visual Designer.