Multiple Languages for Website and Apps
Multiple Languages for Website and Apps
Product: Muvi One (Classic)
Changing Language Name from English to Native
How to Translate Metadata in Content Library
Translating Custom Metadata Values
Translating PPV (Pay Per View) Category
Functionalities/Pages That Support Translation
How Your Website Get Translated
Introduction
Muvi allows you to add multiple languages to your store. By adding multiple languages, you can translate your website and/or app into different languages. When your users select their preferred language on your website and/or app, they will see the content in that language. The language is auto-detected according to the Geo-location of the users. You can translate different sections of your store like player, subscription, general section, etc. You can also enable/disable any language, set a primary language, import multiple languages, change the language name to native, etc.
We support language translation via manual method. That means you have to translate the content of your website and/or app manualy in the CMS. This is more accurate way to translate the content as you can verify whether the translation is correct or not and you have the option to rectify it. Whereas the auto-translation method of Google Chrome browser doesn't always give you the correct translation of the content and there is no option to rectify the translation. If you still want to do the translation using the auto-translation method, you can do it using an API.
Setting up Multiple Languages
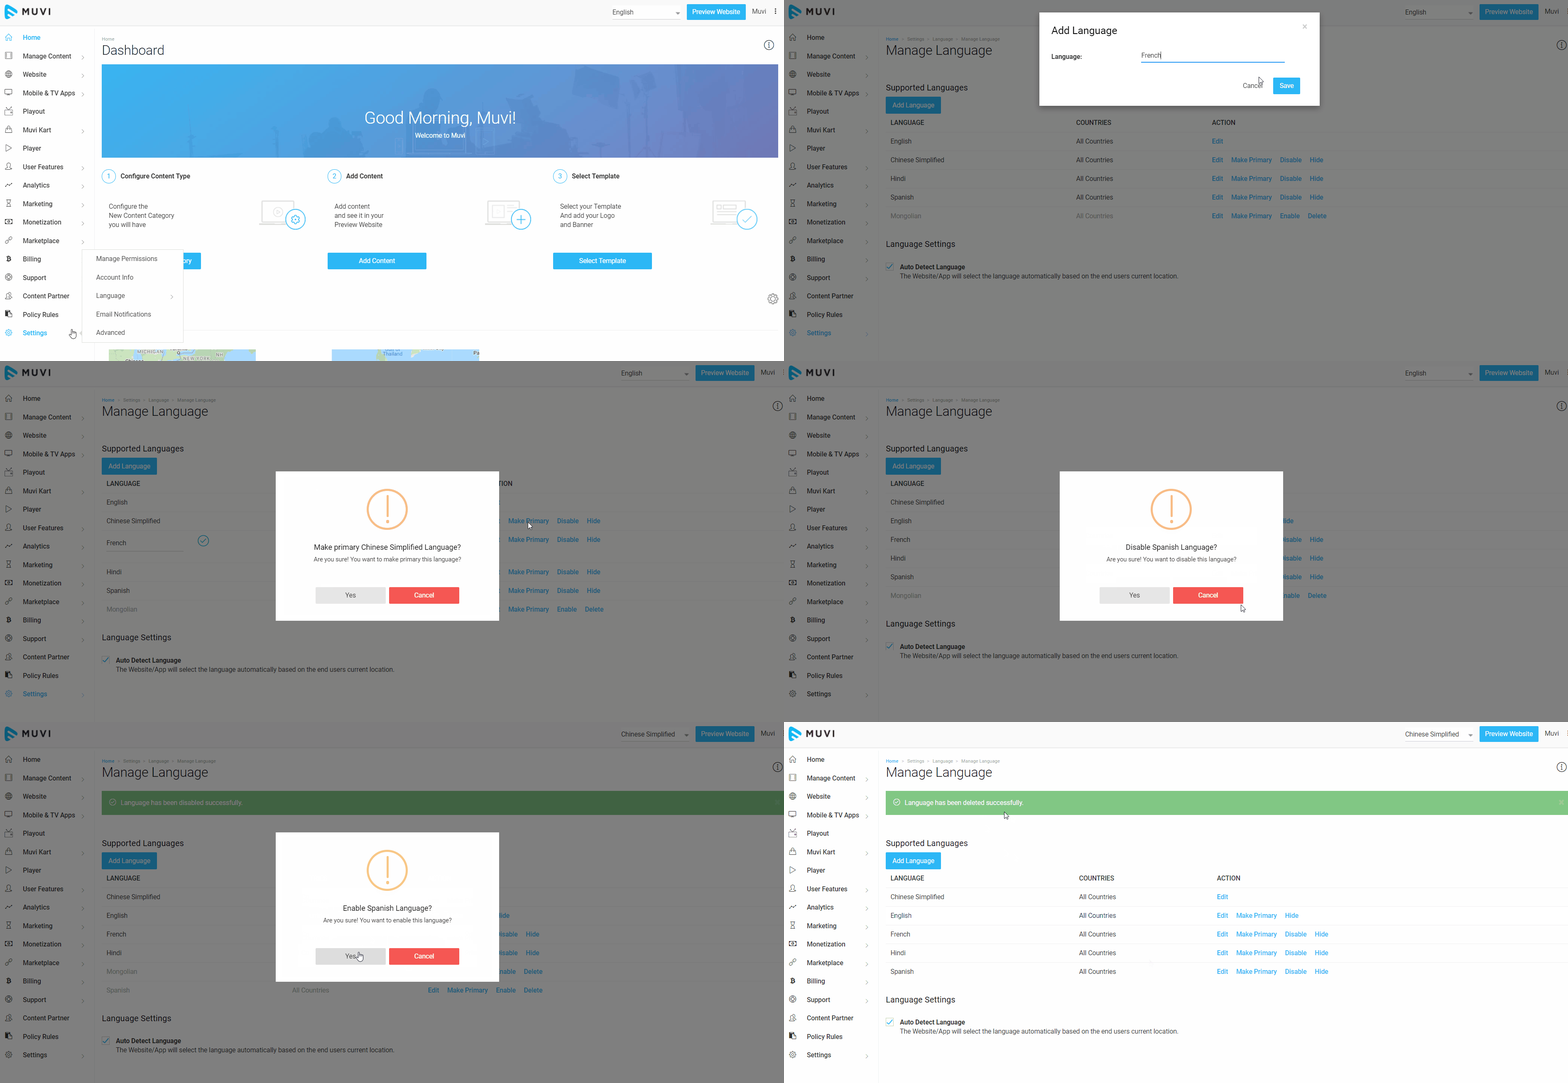
- Go to “Settings”-->”Language”-->”Manage Language” in your Muvi CMS
- Click on “Add Language” button. Type the language name on the search bar that you want to add.
- Then click on “Save”. The particular language will be added to your list. You can add as many languages you want.
- Click on “Make Primary” to make the language primary. (The language will become the Primary language for your store)
- If you want to disable a particular language, then click on “Disable” (The language will not show on the front-end in the language drop-down)
- Click on “Enable” to enable a particular language
- You can also delete a particular language by clicking on “Delete” (A language can be deleted only when it is disabled)
Enable Auto Detect Language
You can enable "Auto Detect Language" feature, so that when users of a specific region access your website/app, the content of the website/app will be automatically changed to the language of that region. For example, you have added Japanese language and translated the content of your website/app to Japanese language but you have set your default language to English. When users in Japan access your website/app the content will be automatically changed from English to Japanese. No manual intervention is required.
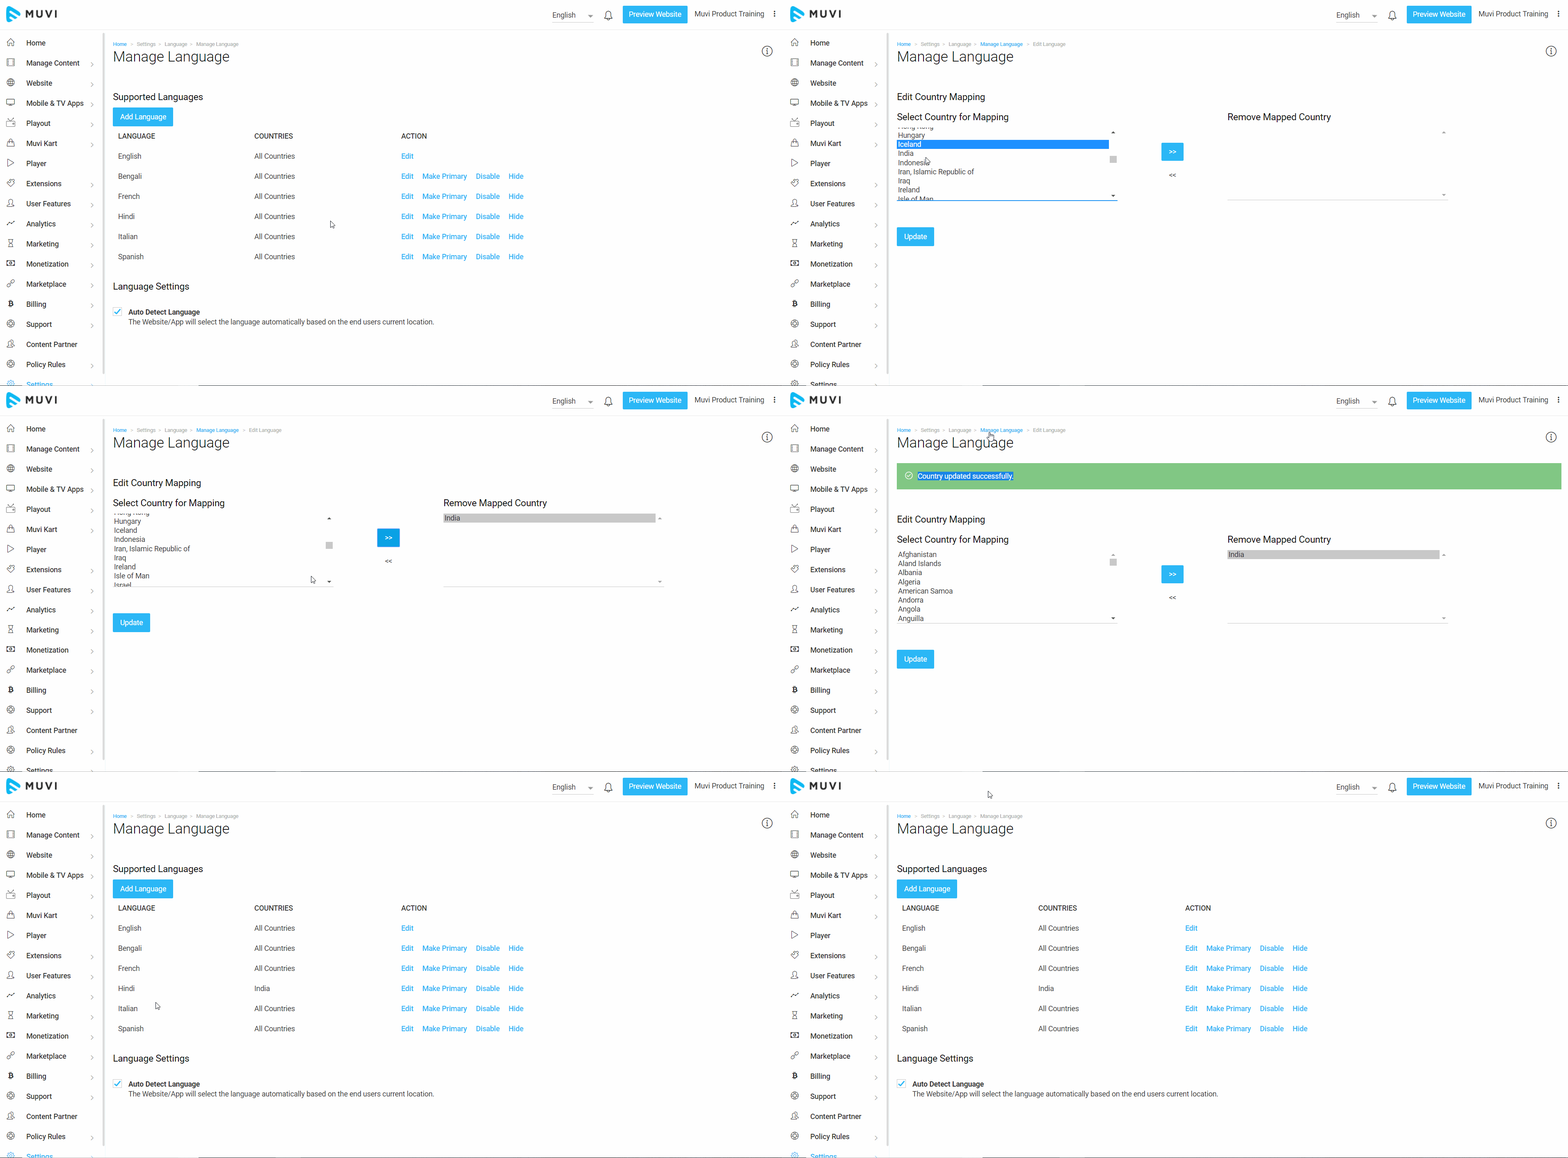
Before enabling this feature, first, you need to map the language with the country. For example, if you want to enable auto detect language for your Indian users, then you have to map "Hindi" language to "India". So, when your Indian users open your website they will see it in Hindi once you enable the "Auto Detect Language" option.
- To map language with country, click on the "Edit" button on the right-hand side of the language.
- Under "Select Country for Mapping", select the country from the drop-down.
- Click on the >> icon
- Lastly, click on "Update". You can also map multiple countries for one language.
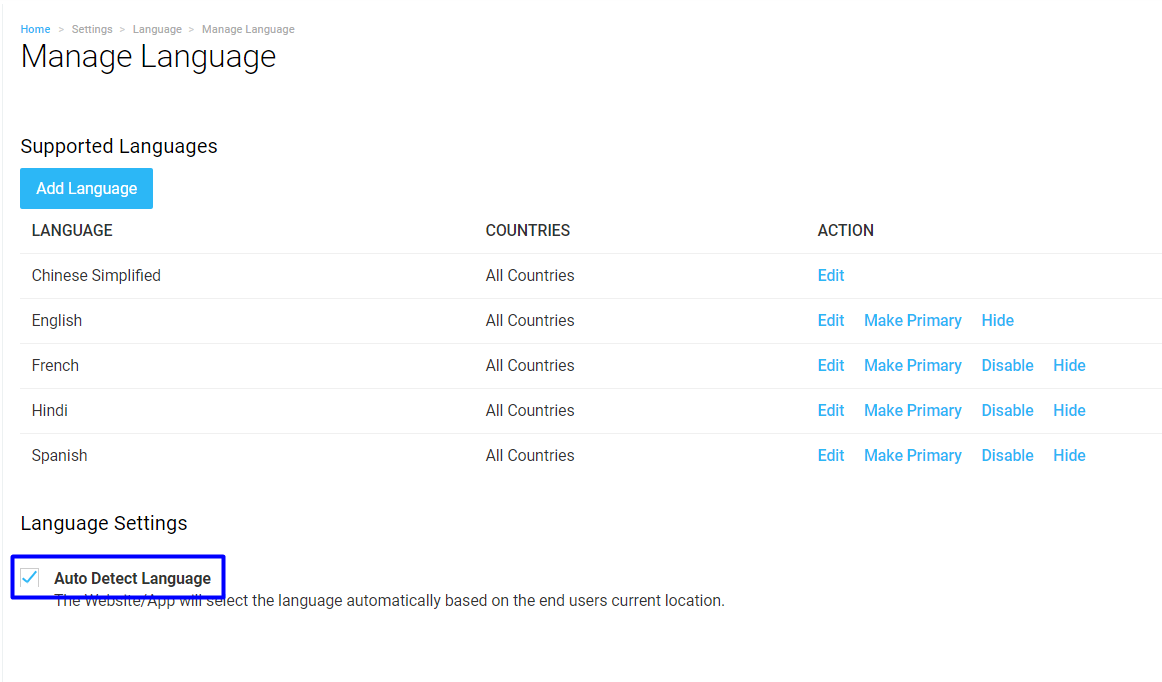
After maping the specific language with the specific country, you need to enable the "Auto Detect Language" feature.
- To enable "Auto Detect Language", go to "Settings"-->"Language"-->"Manage Language" in your CMS
- Under "Language Settings" select the check box "Auto Detect Language"
- To disable this feature, simply uncheck the check box.
Changing Language Name from English to Native
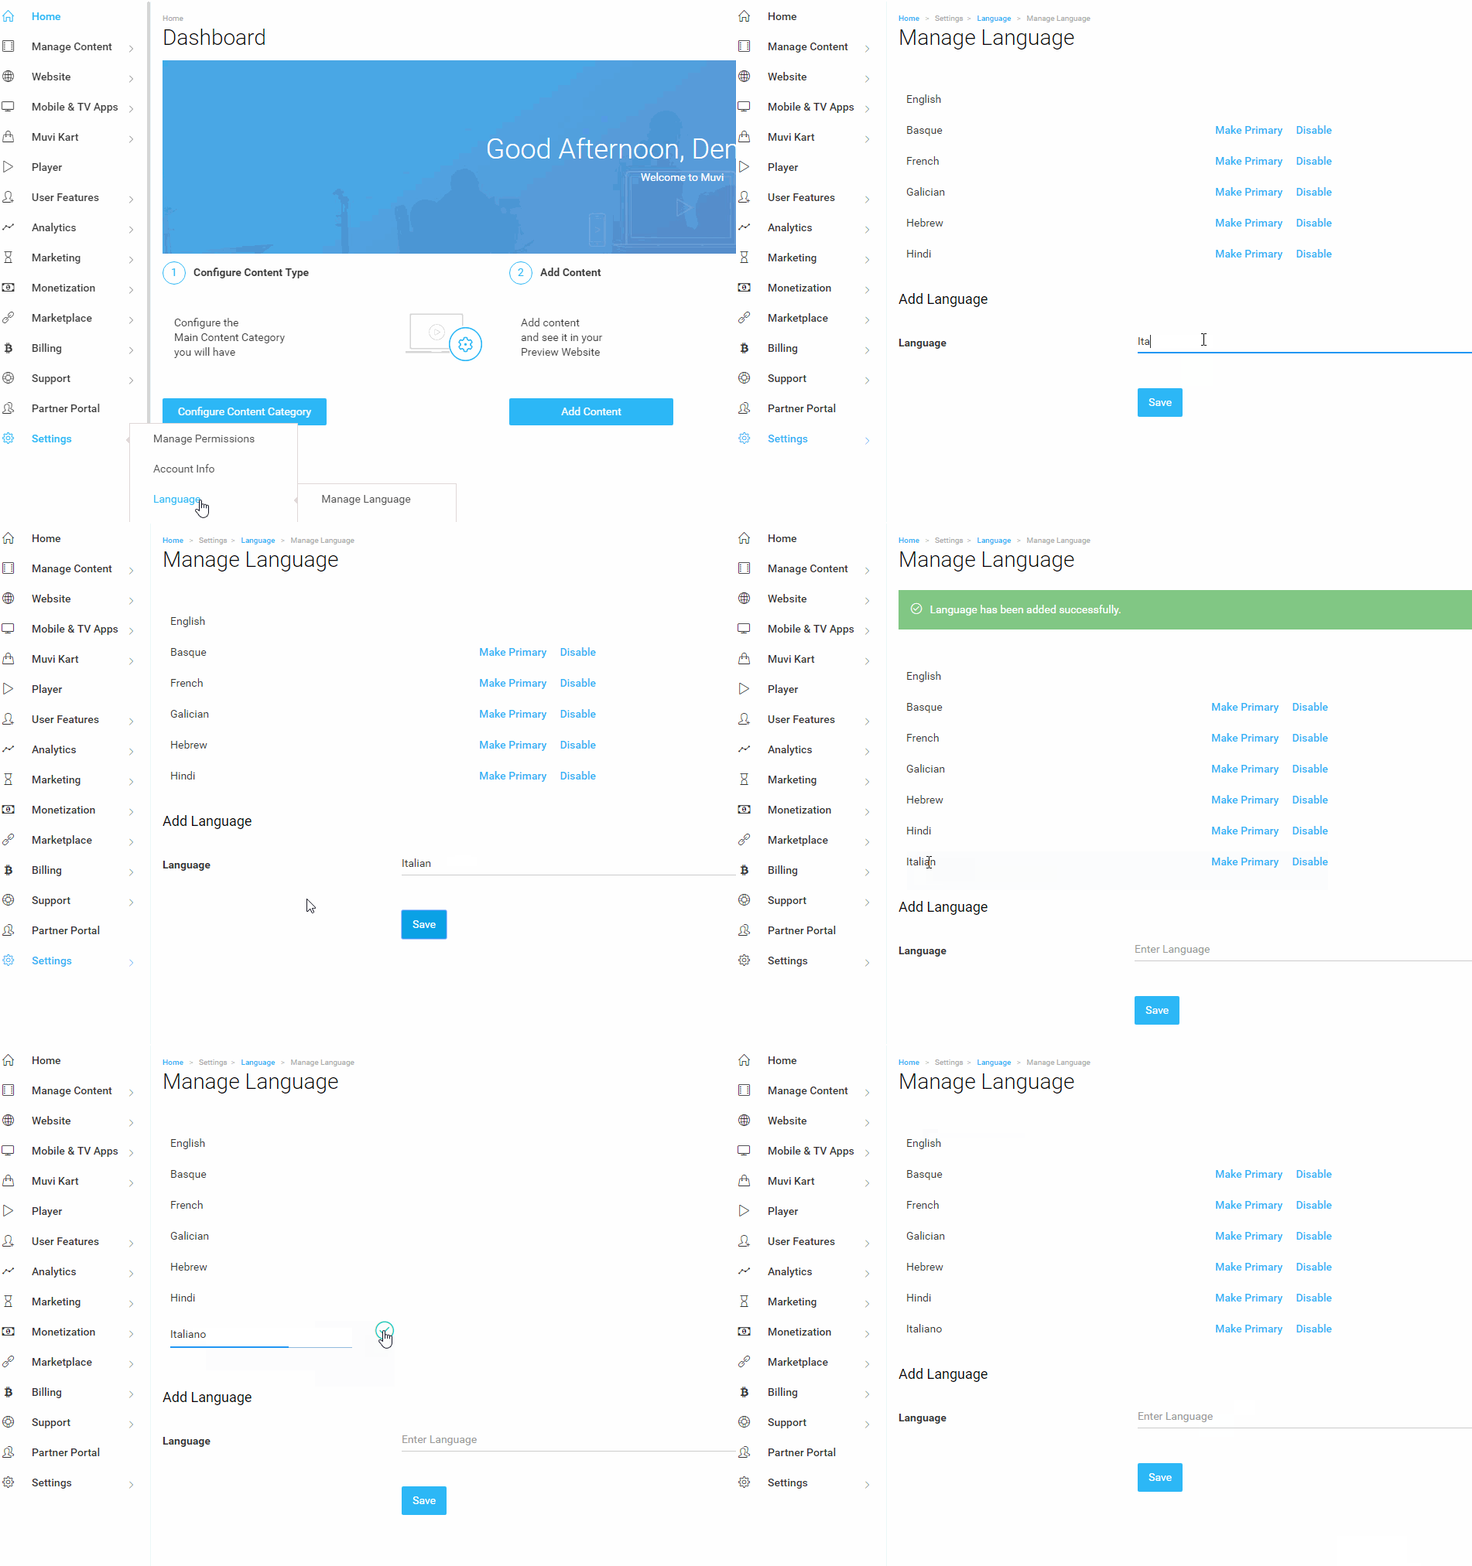
You can change the English name of a language to its native name to make it easier for people to choose their native language from the drop down menu of your website. For example, the native language of Italy is “Italiano” while its English name is “Italian”. You can change Italian to Italiano. To change language name, go to “Settings” -->”Language”-->”Manage Language” in your CMS.
In the “Add Language” section, type the English name of the language you want to add in the search bar. Then select the language and click on “Save”. The language will be added to your list. Now, click on the language to change its English name to native name. Change the name of the language and click on the tick mark to save.
How to Do the Translation
There are 2 methods available for translation. In the first method, you have to do the translation directly in your CMS. Here you have to translate each filed name manually to another language. In the second method, you have to export the field names in CSV format (MS Excel) to your computer. Then after translating the fields manually, you have to import the translated data in an MS Excel file to your CMS. In this process, you can translate multiple categories at a time.
1.First Method for Translation
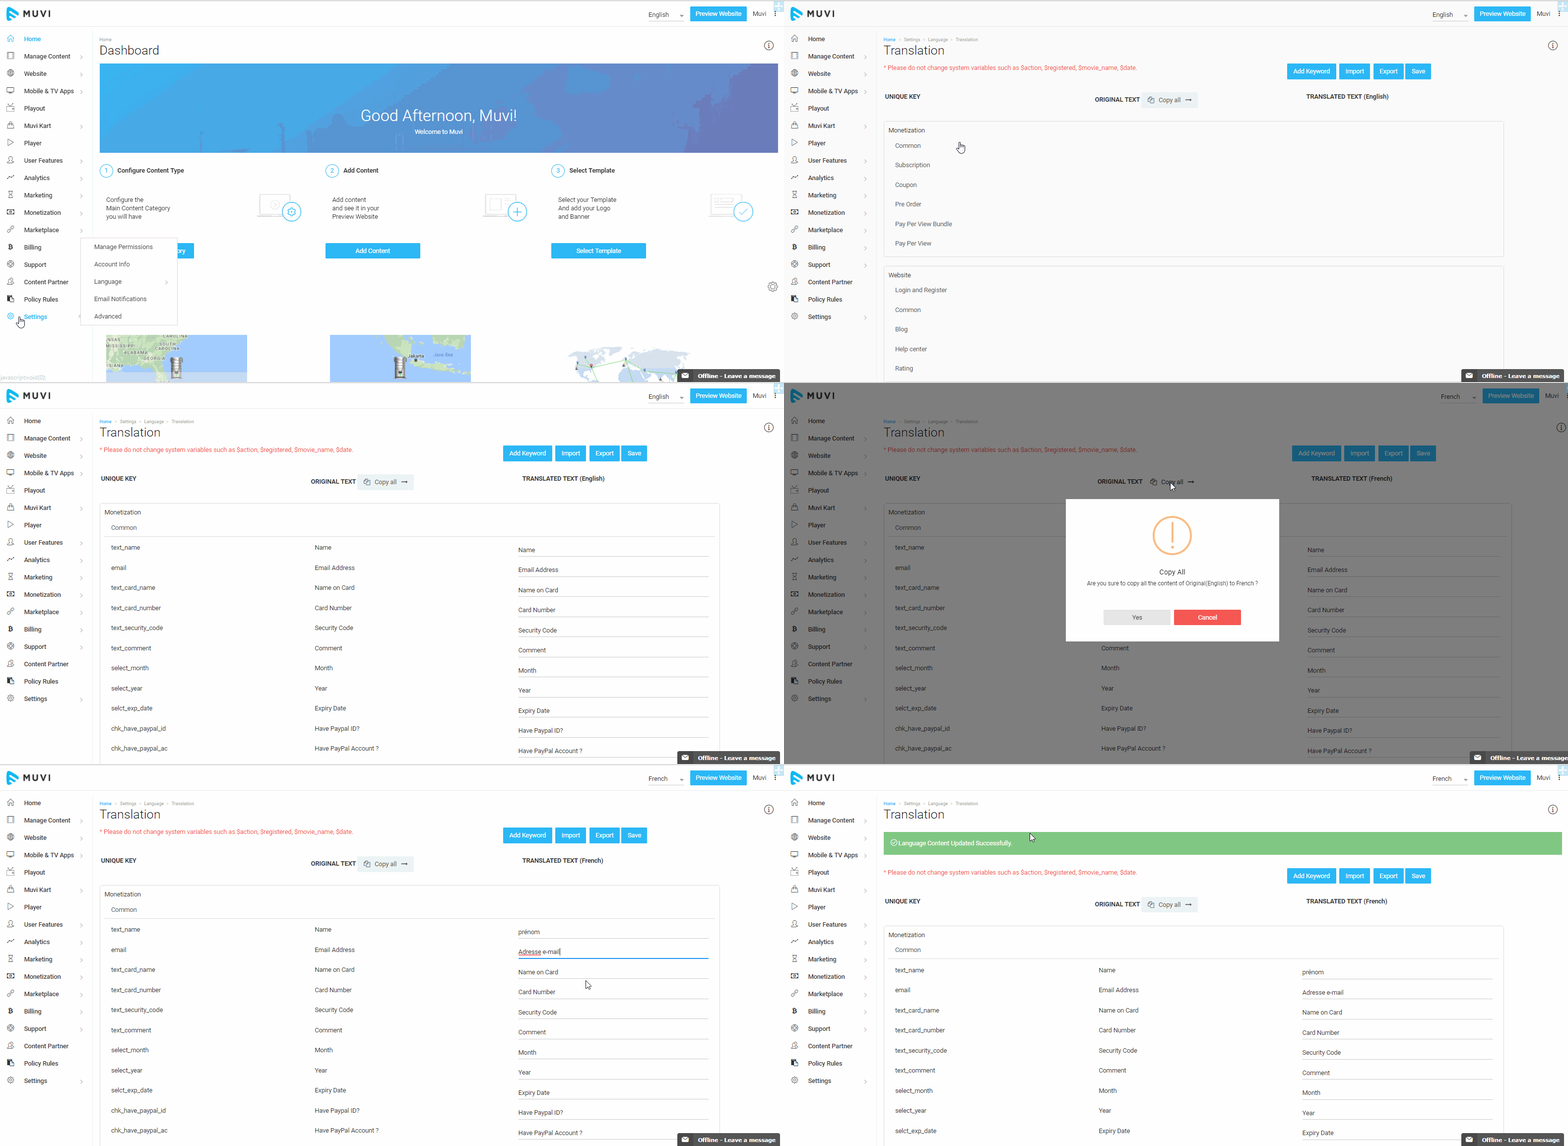
- Go to “Settings”-->” Language”-->” Translation” in your CMS
- You will see different categories and sub-categories for translation. You can select any category for translation. Under each main category, there are sub-categories. Under each sub-category, there are different fields that you can translate to your preferred language.
- Under the main category, click on a sub-category. (For example, under "Monetization" click on "Subscription" to translate all the fields and labels related to subscription) You will see "Original Key" and "Original Text" for different fields.
- Select the "Language " from the drop-down menu on the top right corner of your screen.
- Click on "Copy All" next to "Original Text. All the original text in English will be copied to the translation field.
- Manually change the original text in English to your preferred language. (For example, for “Name” you have to type “prénom” if you are translating to French).
- Click on “Save” on the top of the screen to save the translations.
Note:
- You can translate any group or all the groups by following the above-mentioned procedure. We support any number of characters in a single translation key. That means you can translate a whole paragraph.
- To search a particular translation key in a specific category, first, you need to expand that category by clicking on it and then select CTRL + F key on your keyboard and type the key name in the search bar.
- After translating the messages/texts, you need to clear the website cache to reflect the translation properly on the website.
2.Second Method for Translation
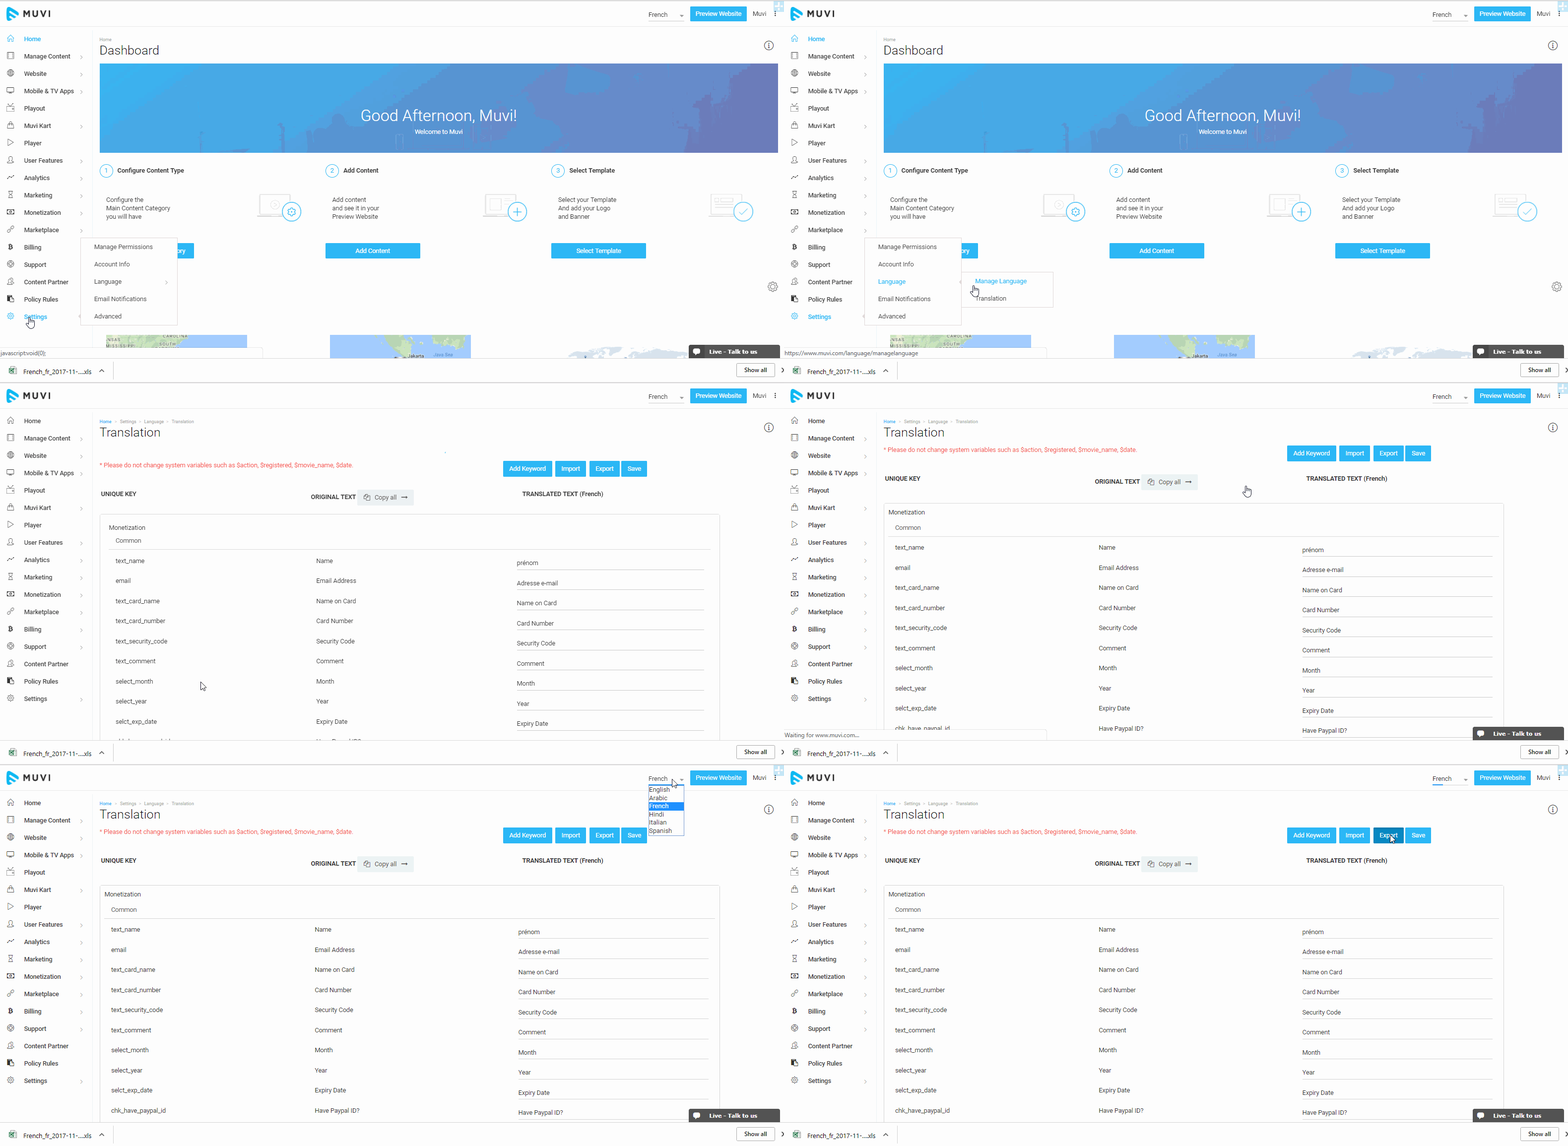
- Go to “Setting”-->”Language”-->”Translation” in your CMS
- In the Translation page of your CMS, first select the Language from the drop-down (For example, if you want to translate to French, then select French).
- Click on “Export”. The MS Excel file will be downloaded to your computer with all groups and fields that can be translated.
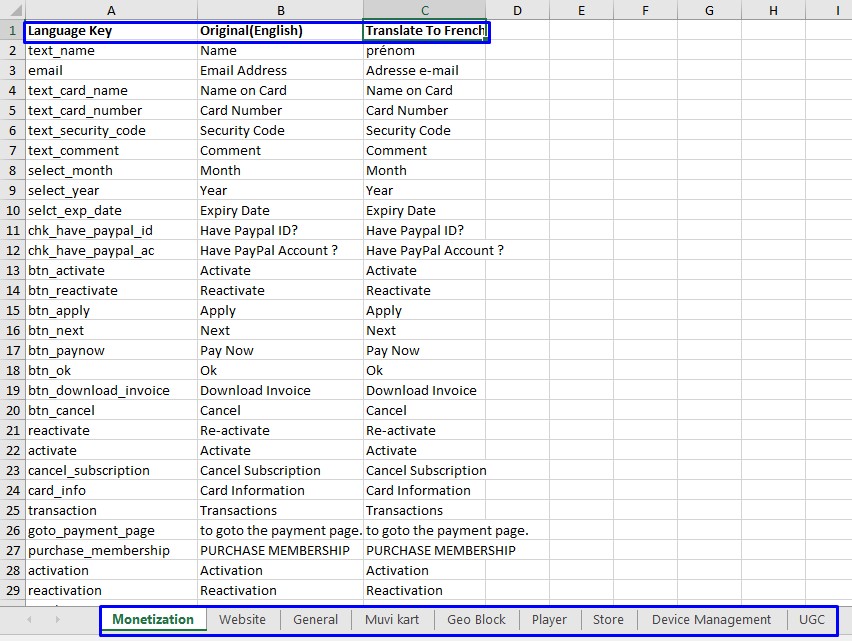
- In the downloaded MS Excel file, change the field names of any category to your desired language manually, as mentioned in the first method. You can select the category at the bottom of the MS Excel file (See Below Screenshot)
- After completing the translation, save the MS Excel file.
- Go to “Setting”-->”Language”-->”Translation” in your CMS
- Select the language to which you are translating from the drop-down. (If you are translating to French then select French). Import function may not work properly if you will select the wrong language.
- Then click on “Import”
- All the translations will be updated in your CMS
Note: Please do not change the worksheet name. (For example, if you have selected French language from the drop-down menu, then MS Excel file will be saved as "French_fr_2017-11-14-09-19-29". Do not change its name)
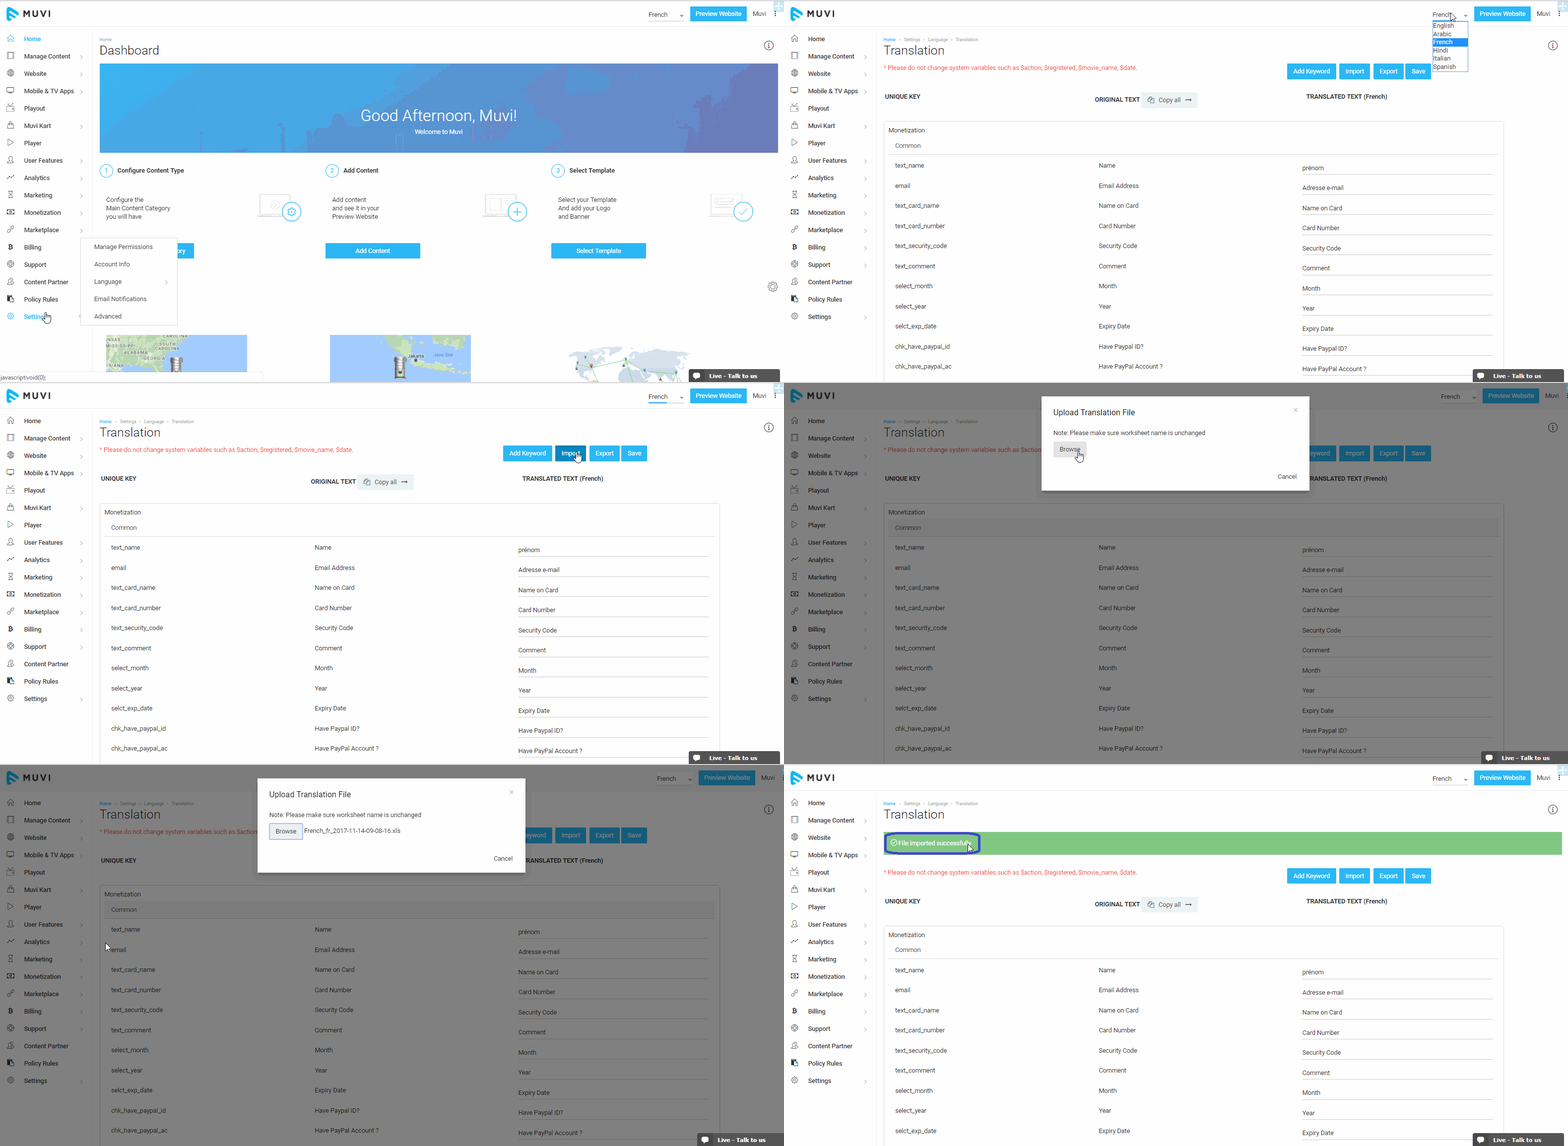
- You can do translations for different categories (i.e. Monetization, Website, UGC etc.) in a single MS Excel file and import them at a time.
How to Translate Metadata in Content Library
You can easily translate the content metadata in content library by using the Language Translation feature. When your users select a language on your website, they can see the content title, description etc. in their chosen language.
- Go to “Manage Content” -->”Content Library”
- Select the content you want to translate
- Click on “Edit Content” on the right-hand side of the content
- In the Edit Content page, select the language from the drop-down menu
- Change the desired metadata fields in your choice of language
- Click on “Update Content”
When your users select the language on your website’s drop-down menu the content metadata will change to their preferred language.
Note: Remember that, first you need to add your content metadata in English and then you can translate it to any language.
Translating Custom Metadata Values
You can translate the values of any Custom Metadata field . For example, in Genre list you can translate all the values (i.e. Action, Horror, Comedy) to your preferred language.
- Go to "Manage Content" -->"Manage Metadata" in your CMS
- Click on "Edit" on the extreme right-hand side of the content form
- To translate the values of a Custom Metadata field, click on the edit icon on its right-hand side
- Select the Language from the drop-down list
- Type the values in the language you have selected
- Finally, click on "Save"
Note: First, you need to add the values in English while creating the list.
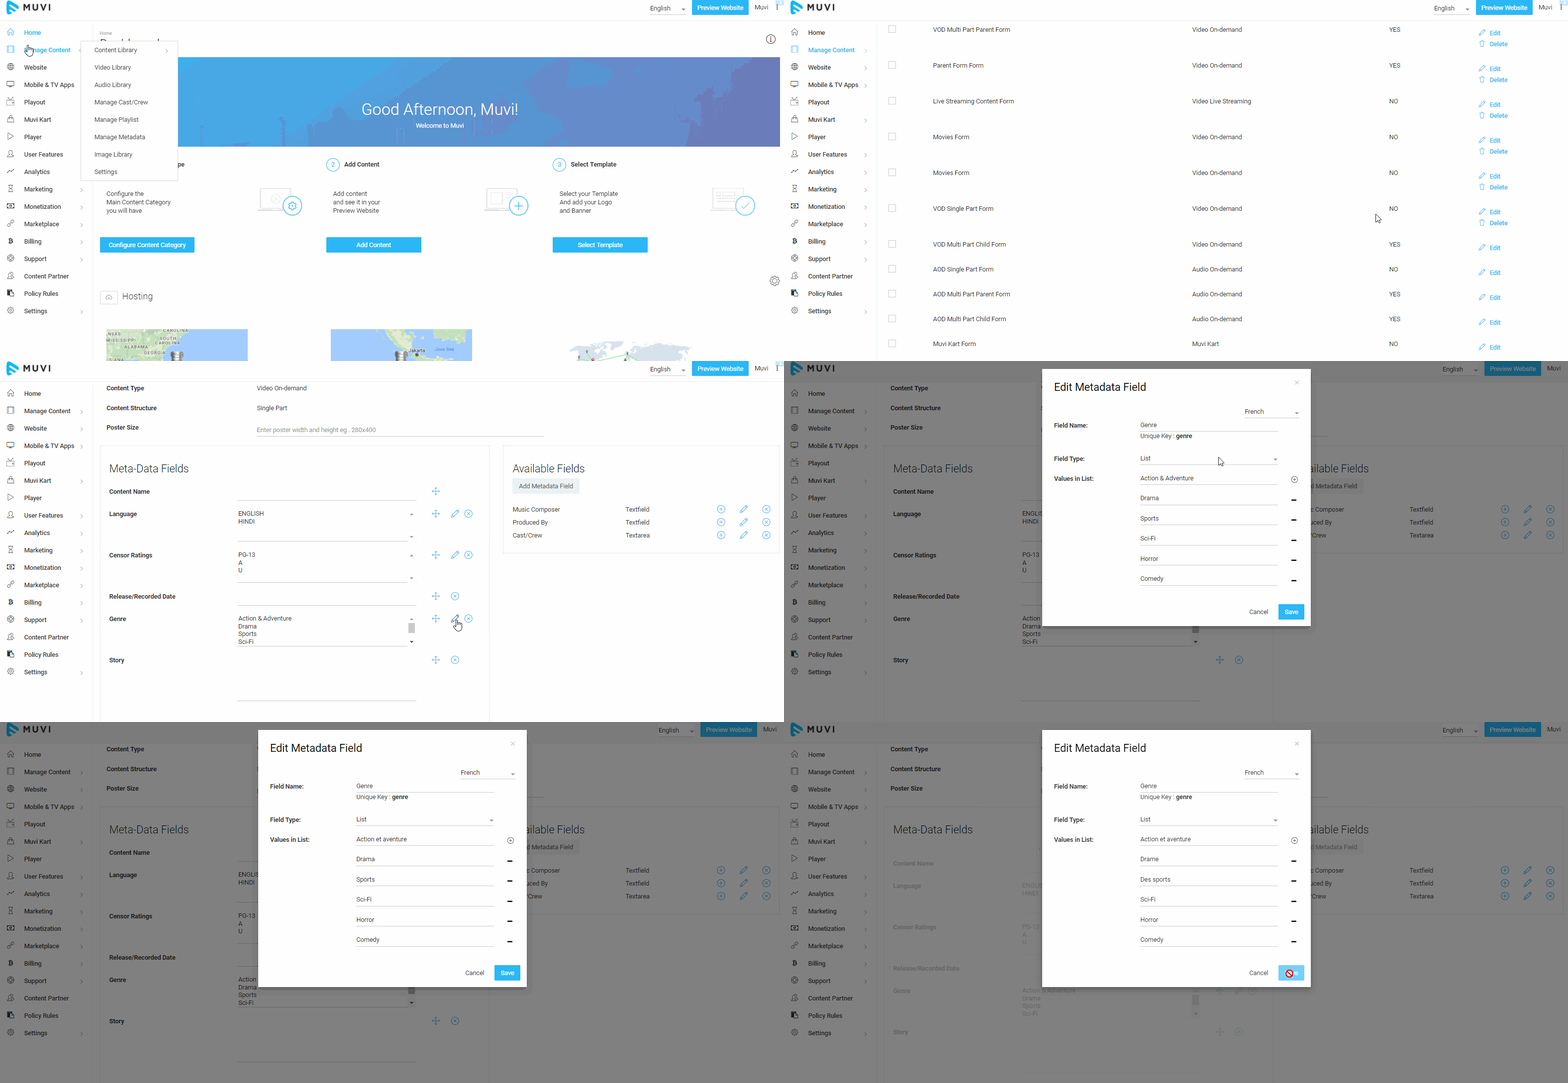
Now the values of the Metadata Fields are translated into your desired language.
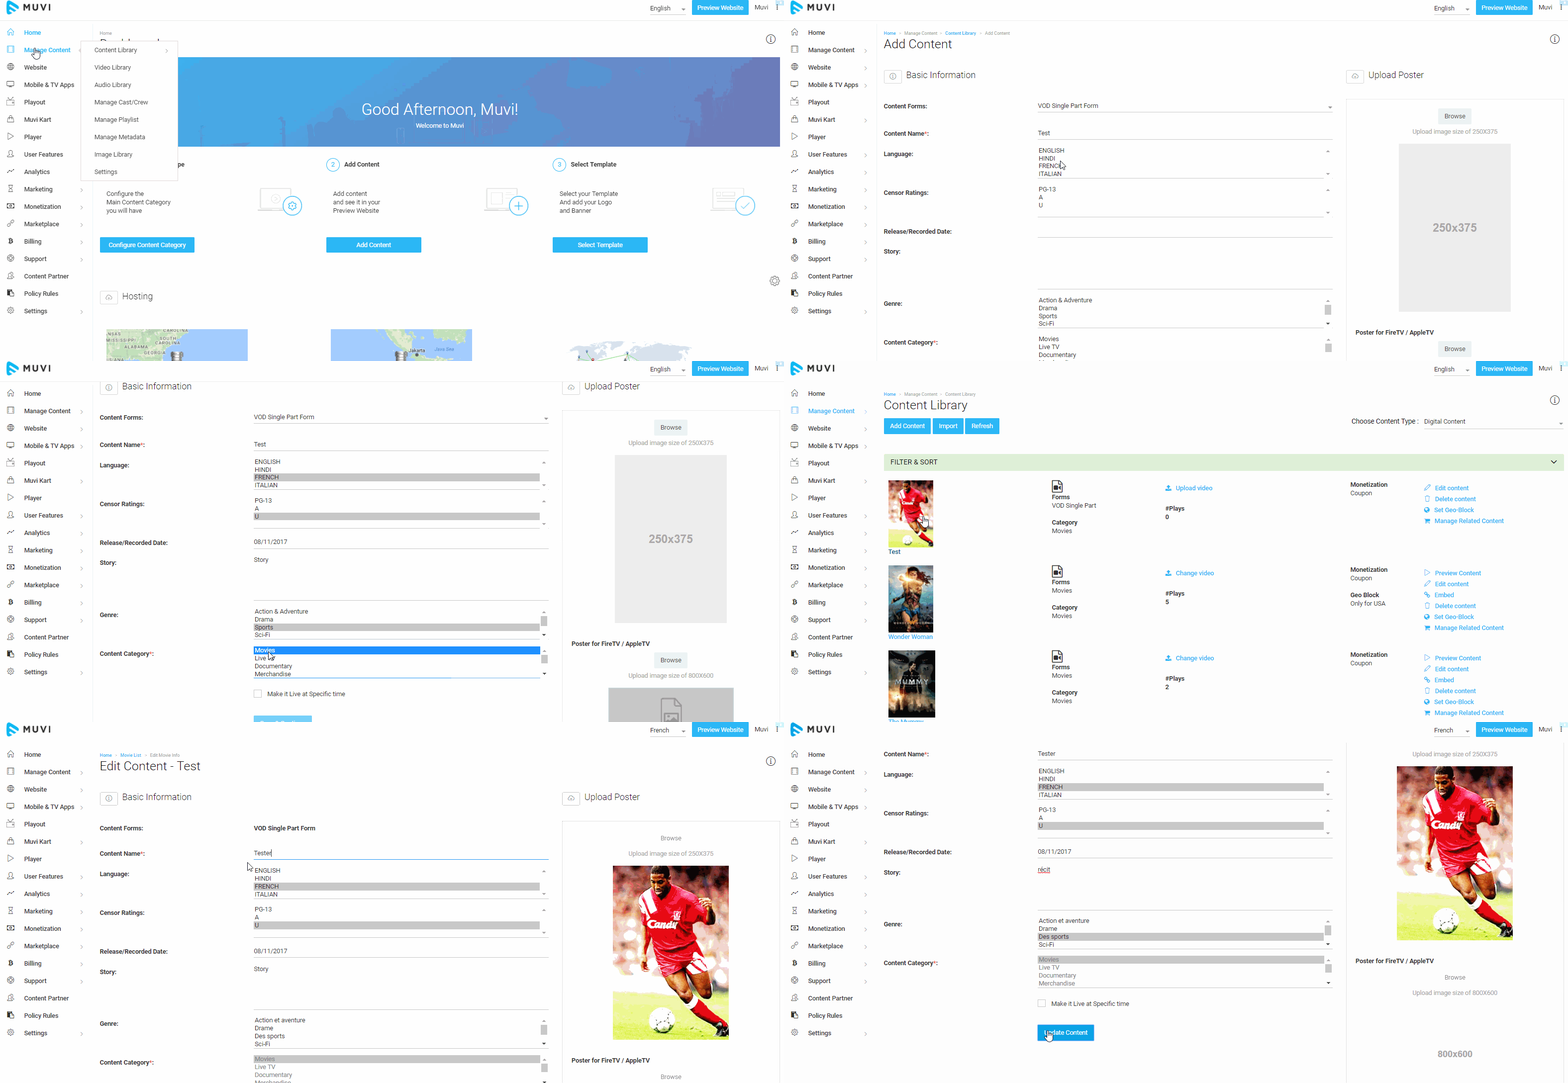
- To add these translated values to new content form, go to "Content Library"-->"Add Content"
- Select the content form from the drop-down list
- Add all the Metadata in English and click on "Save & Continue"
- Go back to the "Content Library" page in your CMS
- Then click on "Edit Content" on the extreme right-hand side of the content you have created
- Select the Language from the drop-down on the top right-hand corner of the CMS
- Translate all the Metadata Fields as mentioned above (See "How to Translate Metadata in Content Library")
- Select the translated value from the drop-down list of the custom Metadata Fields
- Finally, click on "Update Content"
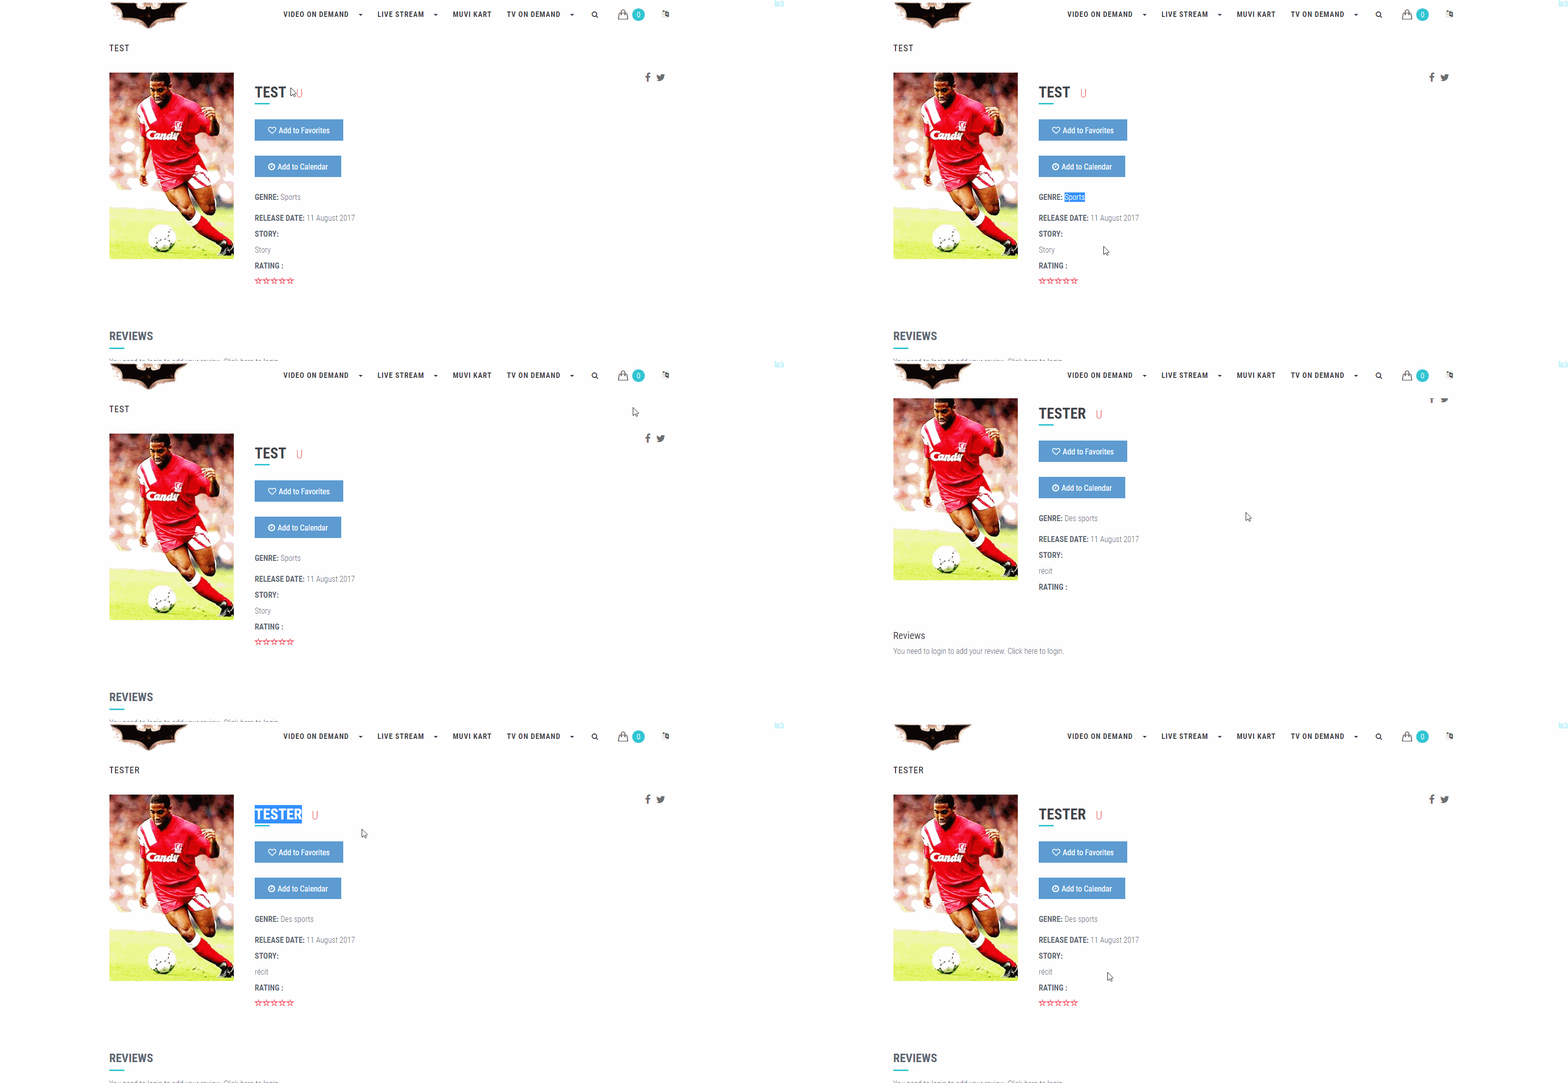
- When your users visit your website and select their preferred language from the drop-down, they can view the metadata of the content in their preferred language.
Translating Cookie Message
You can translate the Cookie Message for your website. When users will visit your website, they will see the cookie message in their preferred language.
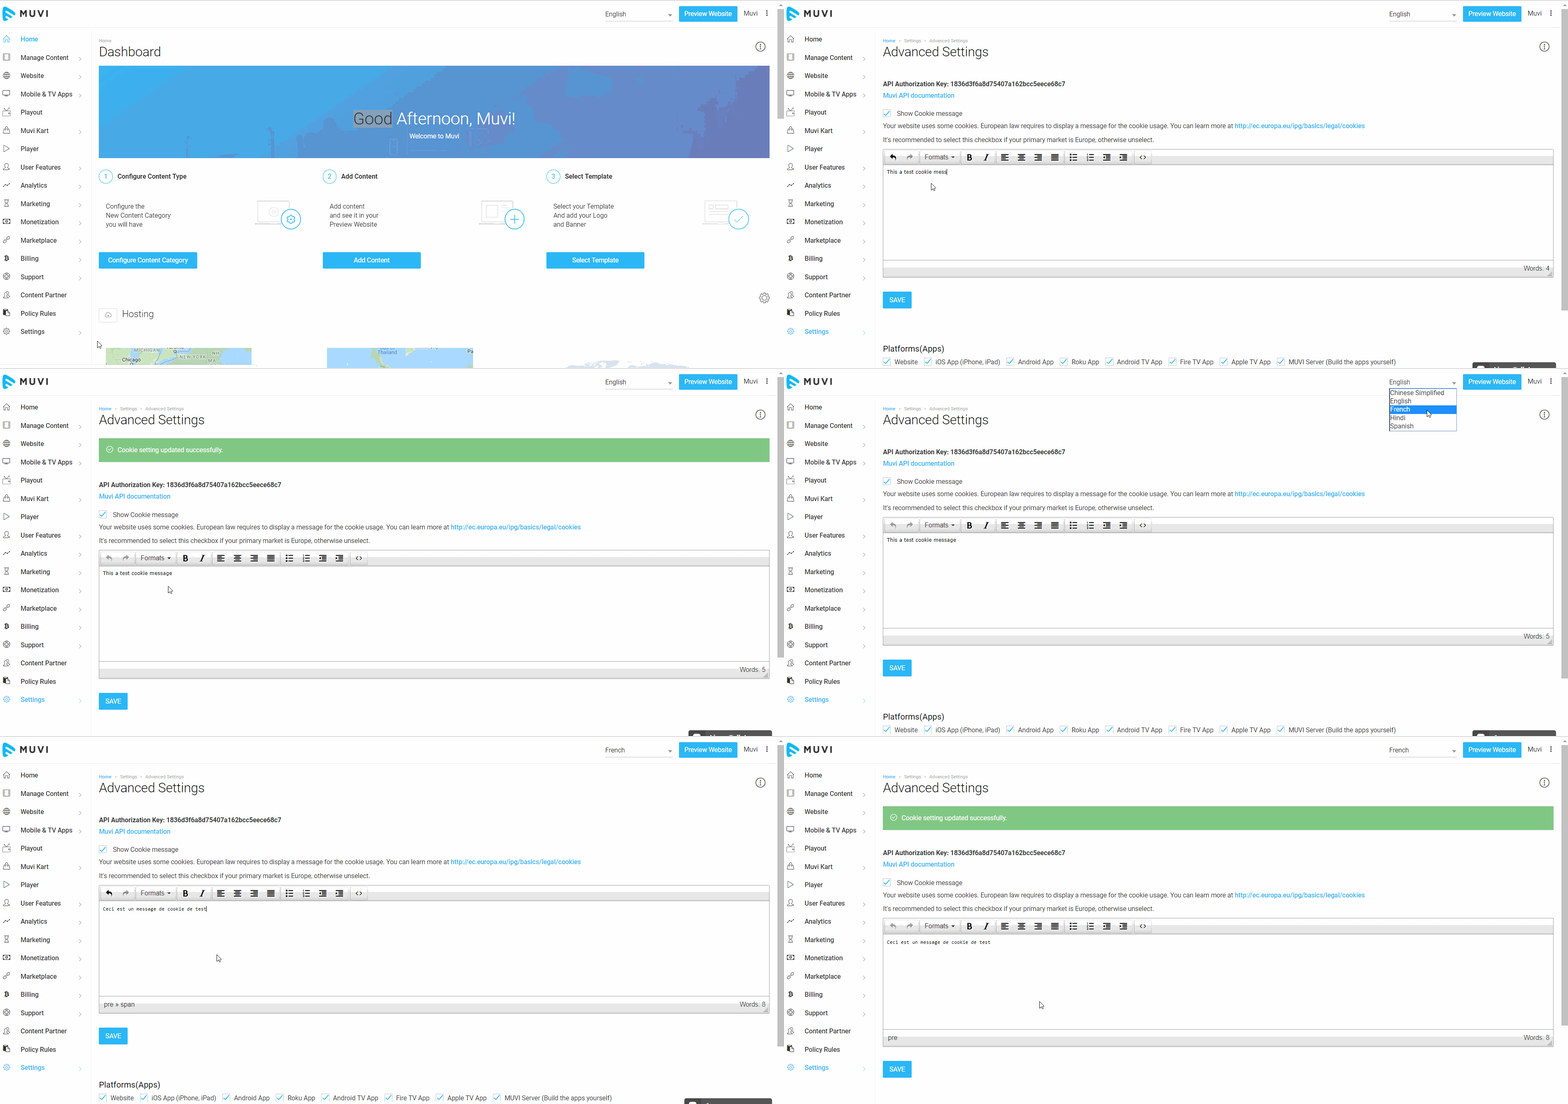
- To translate the cookie message, go to "Settings" -->"Advanced" in your CMS
- First, type the cookie message in English and click on "Save"
- Then select the language of your choice from the drop-down
- Change the cookie message to the selected language and click on "Save"
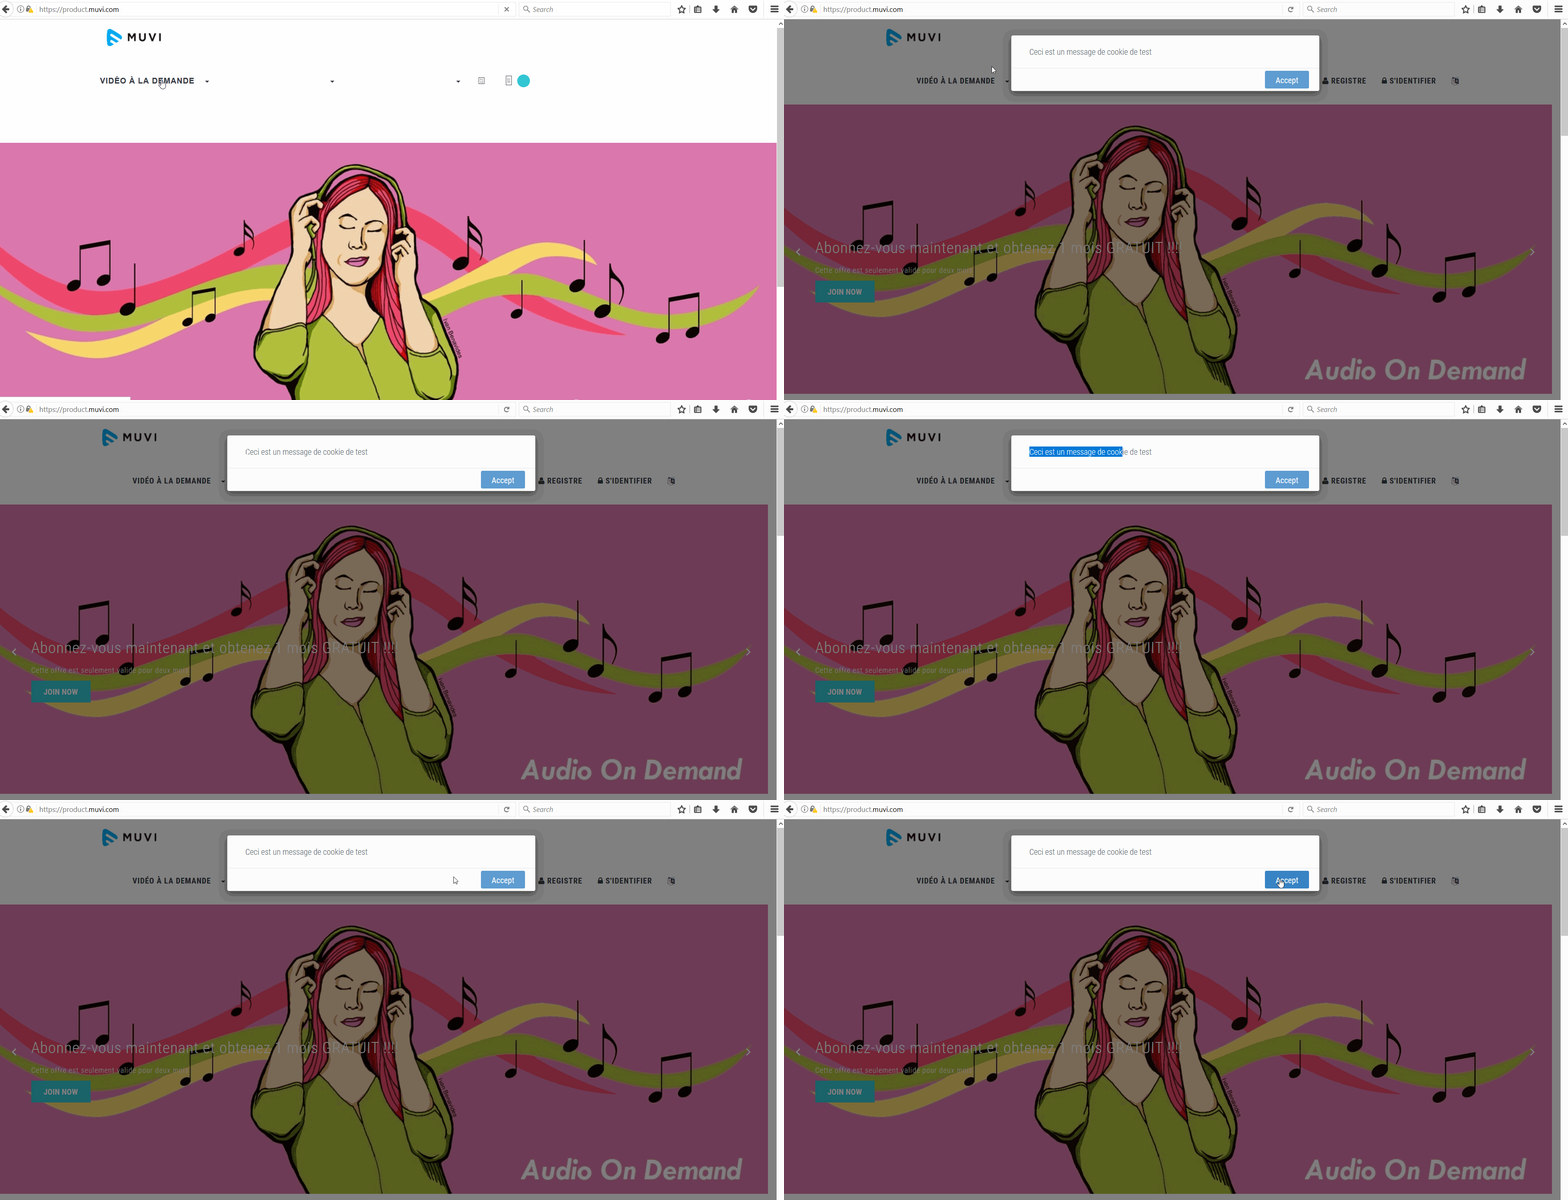
- When your users open your website, they will see the cookie message in their preferred language.
Translating PPV (Pay Per View) Category
You can translate the PPV category name and description. When your users click on a content for which PPV value is already set, they will see the category name and description in their preferred language.
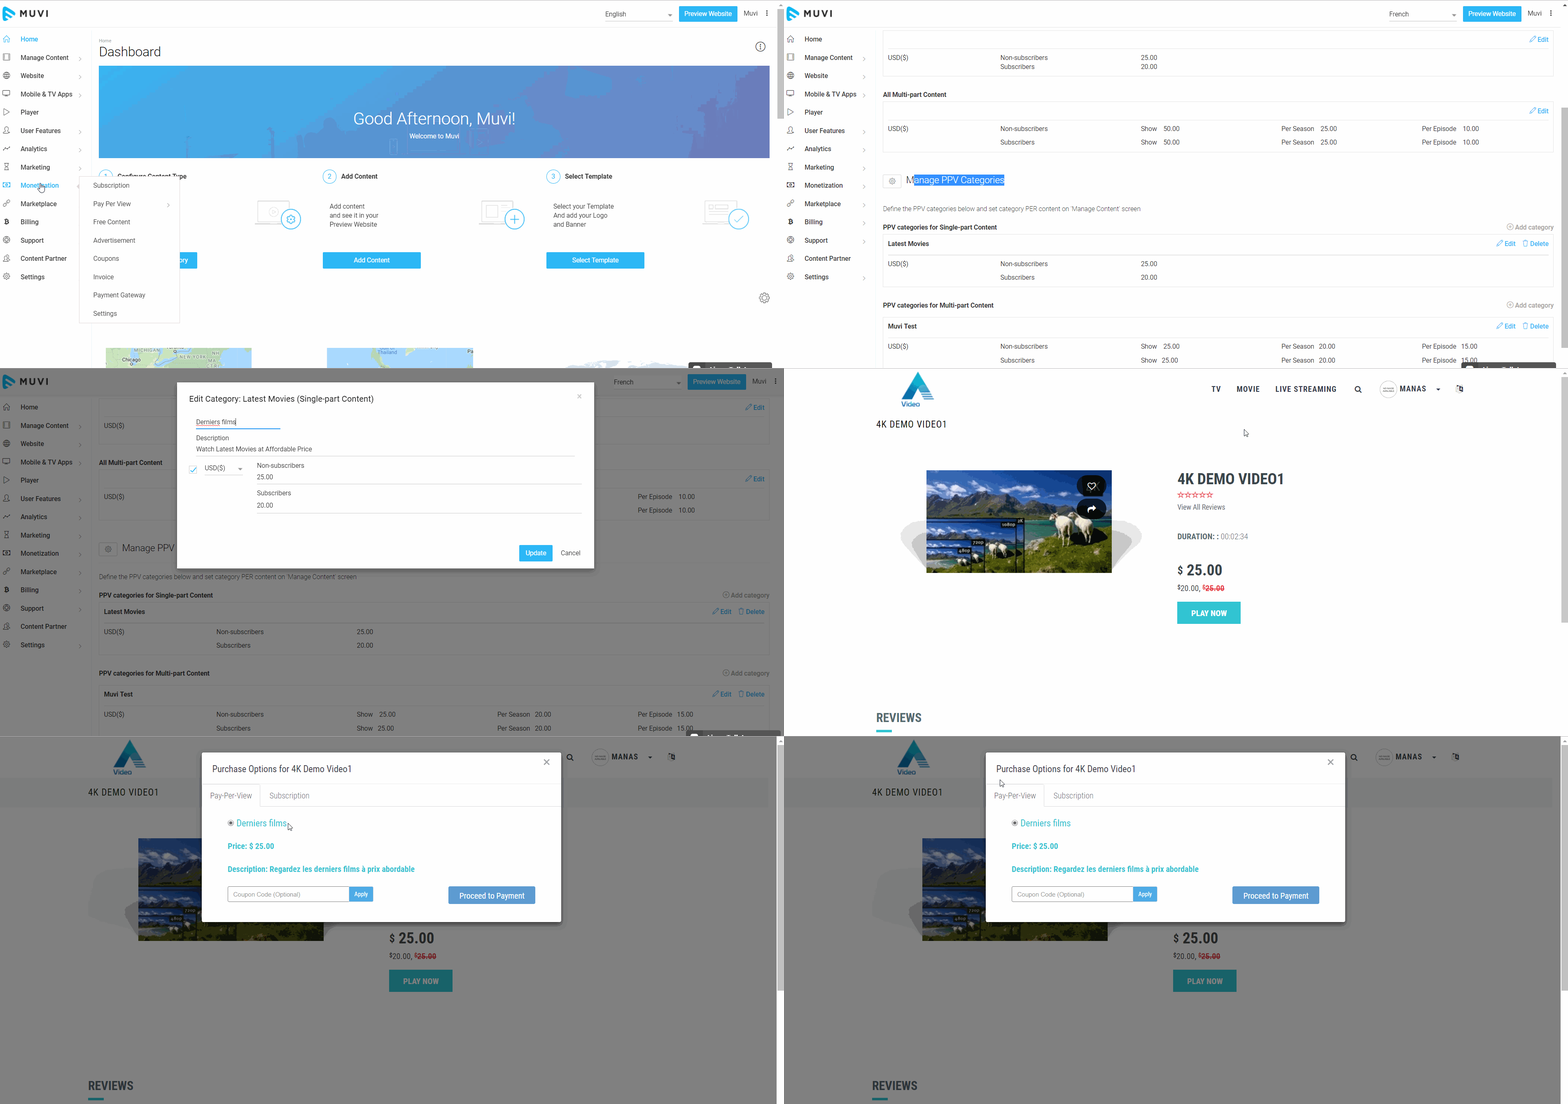
- To translate the PPV category name and description, go to "Monetization" -->"Pay Per View"-->"Pay Per View" in your CMS
- Select the language from the drop-down
- Click on "Edit" under "Manage PPV Categories" (If have not added any PPV category, first, you need to add the category in English)
- Change the title and description of the PPV category to the selected language
- Click on "Update"
- When users click on a PPV content, they will see the Title and Description of the PPV category in their selected language.
Translating Featured Section
On your homepage featured section, you can translate the name of the featured section.
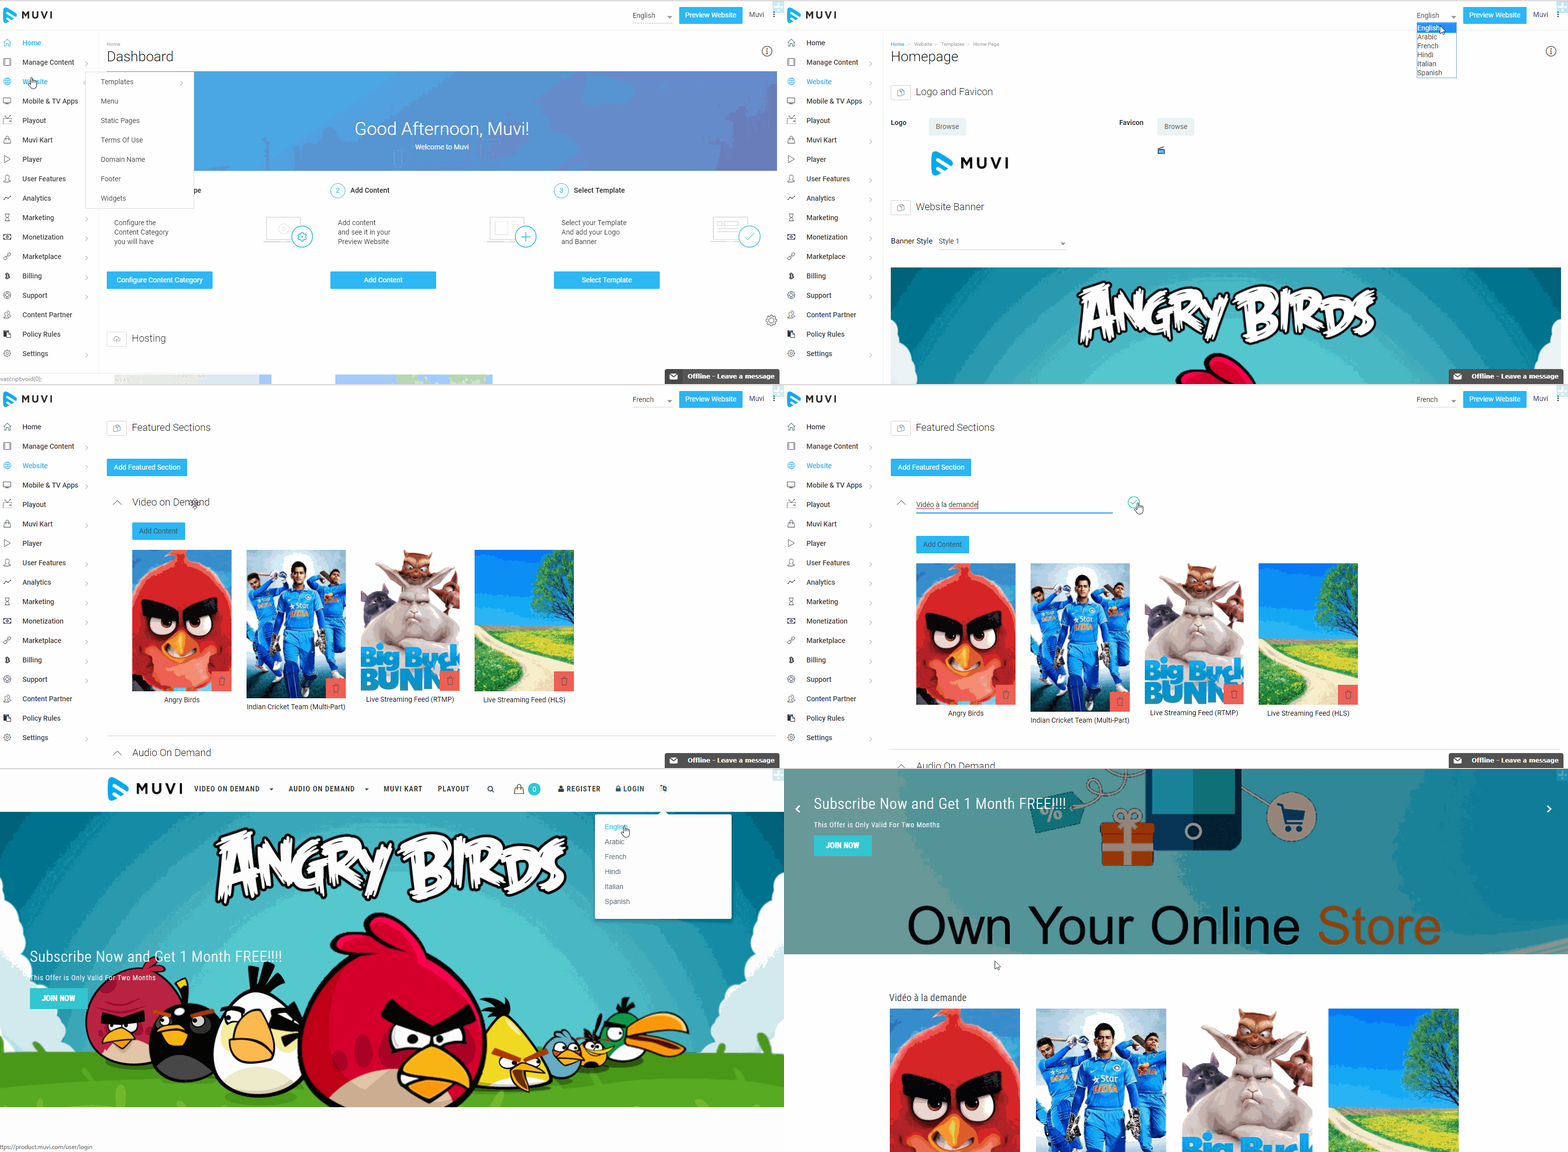
- Go to "Website"-->"Templates" -->"Home Page" in your CMS
- Select the the language from the top right corner of your CMS
- Scroll down to Featured Sections
- Click on the Featured Section name and change the name from English to your desired language (Which you have selected from the drop-down)
- Click on the tick mark to update
When your users will select their preferred language on your website, they can see the featured section name in that language.
Translating Subtitle Name
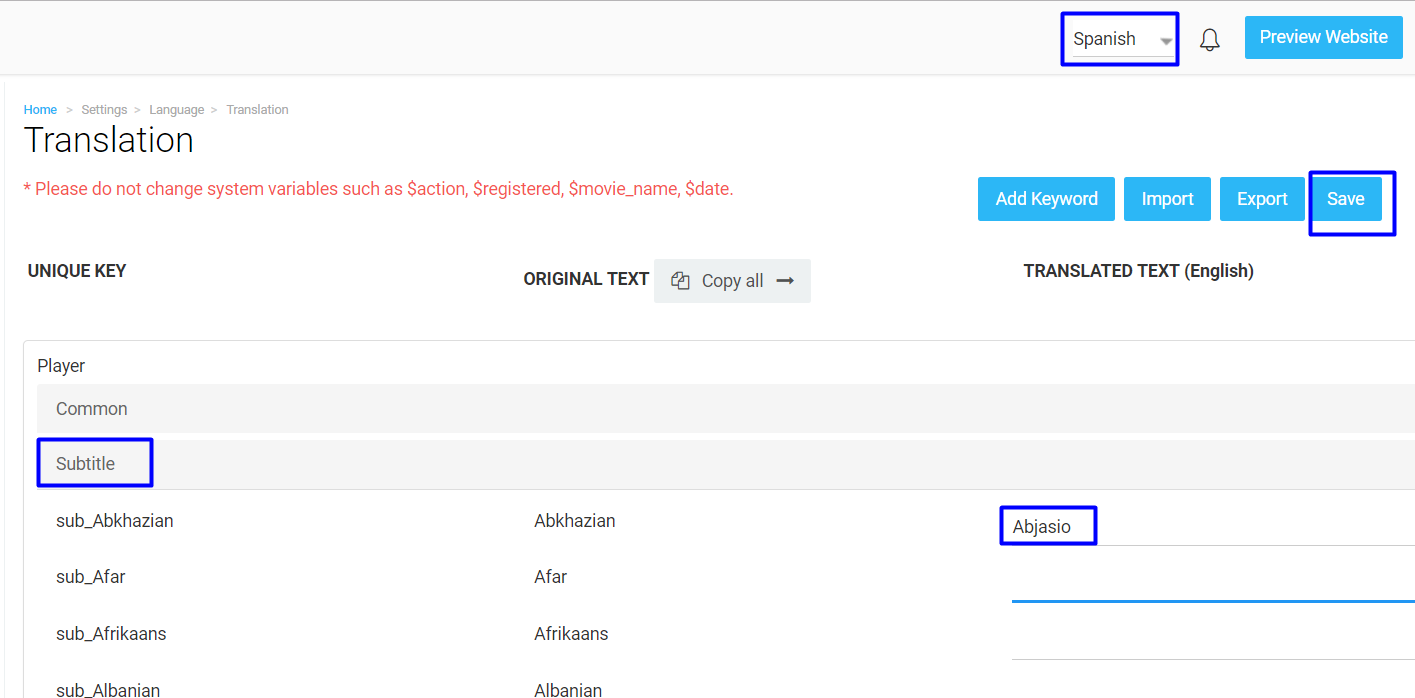
You can translate the name of the subtitle languages you support for your store. For example, if you support Spanish subtitle and you want to show your users in Spain that you support this, then you can translate it into Spanish. (i.e. Español) When users in Spain try to select the subtitle while watching video in your store, they will see the subtitle name as "Español" instead of "Spanish".
- Go to "Settings" -->"Language" -->"Translation" in the CMS
- Under "Player" click on "Subtitle" (See Below Screenshot)
- Select the language from the drop-down and translate the subtitle name to the selected language name.
- Click on "Save"
Translating Static Pages
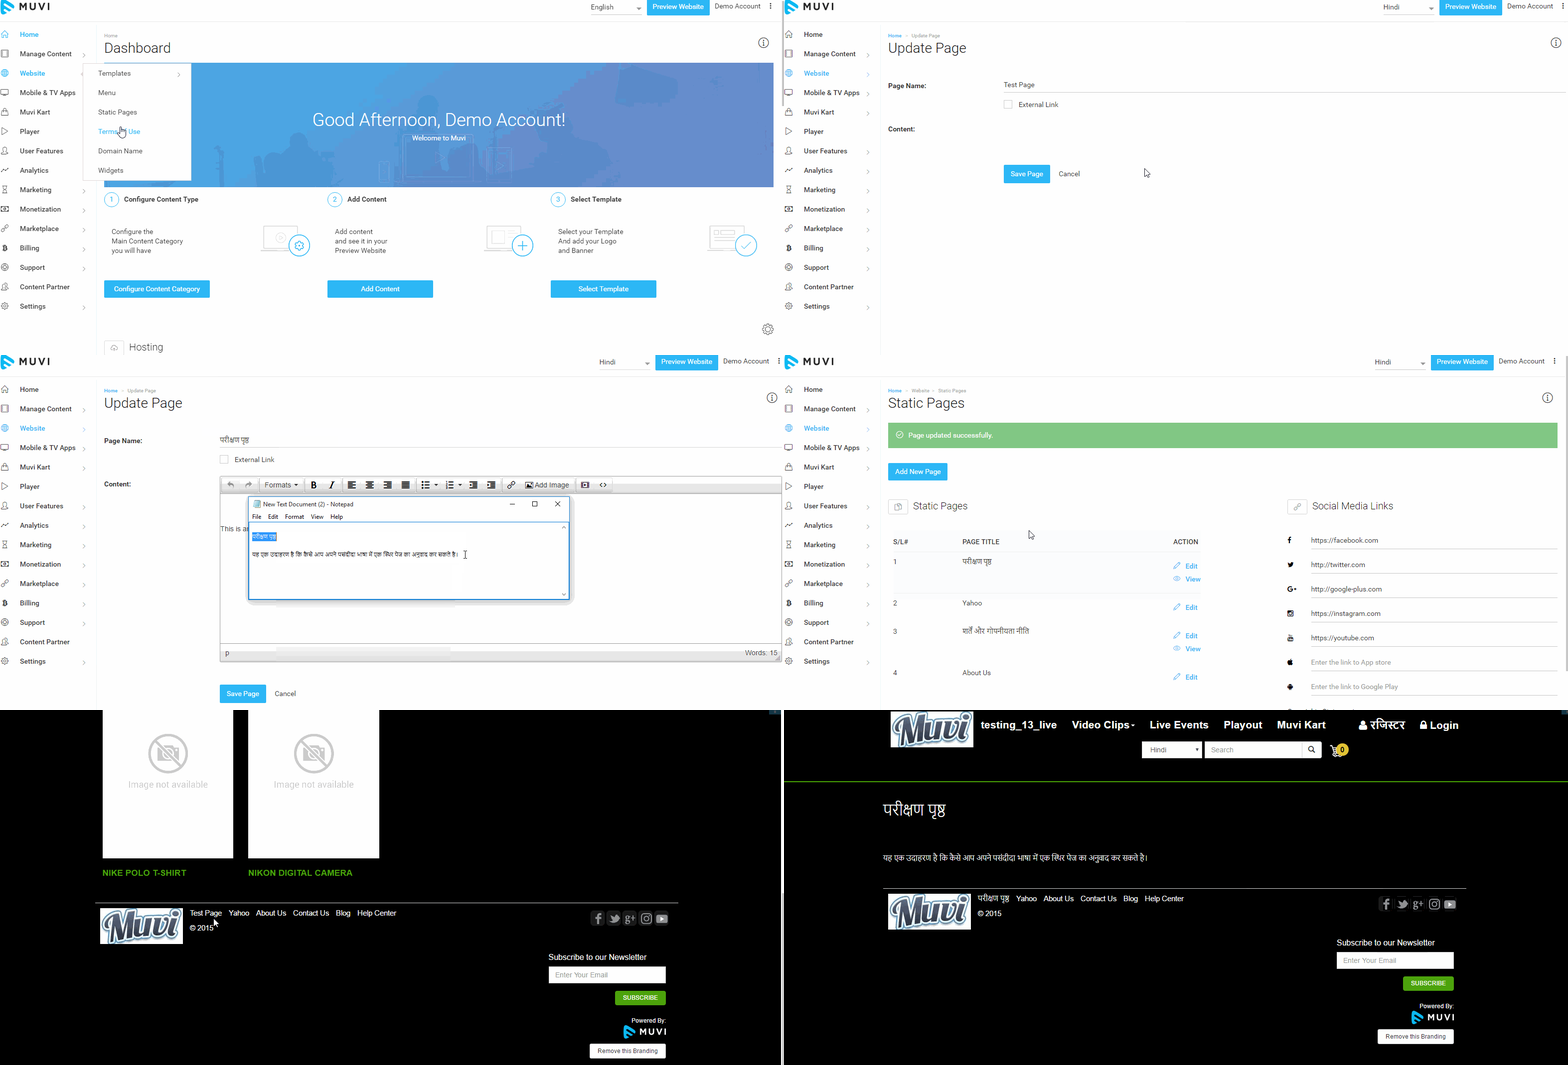
You can translate any static page to your preferred language by using our Language Translation feature. However, remember that, first you need to create a static page in English, then you can translate it to any language.
- To translate a static page, go to "Website" --> "Static Pages" in the CMS.
- On the left-hand side of any static page (The page you want to translate), click on "Edit" under "Action"
- Select the language from the drop-down menu of the CMS (If you want to translate the page in Hindi, then select Hindi).
- In the "Content" field, you need the change the content from English to the language which you have already selected form the drop-down.
- Click on "Save Page". The page will be saved in the language which you have selected. When a user visits the static page and selects Hindi on your website, he/she will be able to see the page in Hindi.
Translating Email Triggers
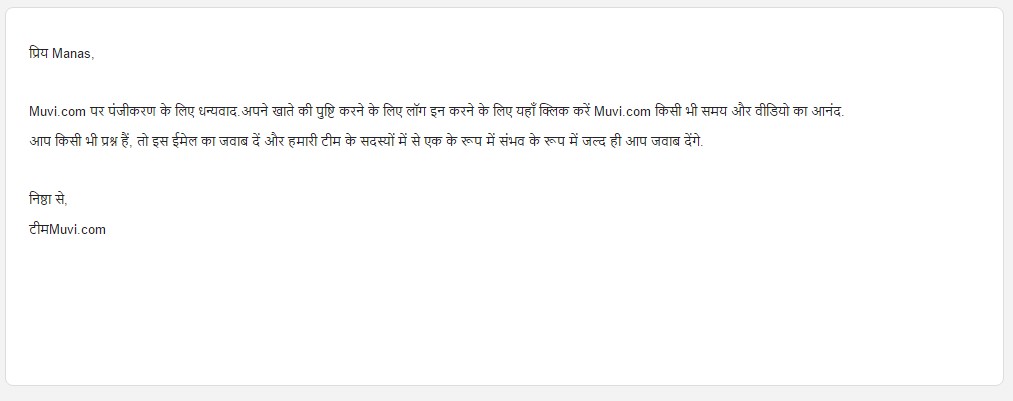
You can translate Email Triggers in your CMS, so that your users can receive email notifications in their preferred language based on their action. For example, if a user selects his/her preferred language Hindi, then he/she will receive a “Welcome on Registration” email notification in Hindi when he/she registers on your website. Likewise, all the email notifications based on the user’s action will be sent to the user in Hindi.
All the email triggers in the CMS are in English by default. So, you need to select each user action from the drop-down list and translate it to any other language.
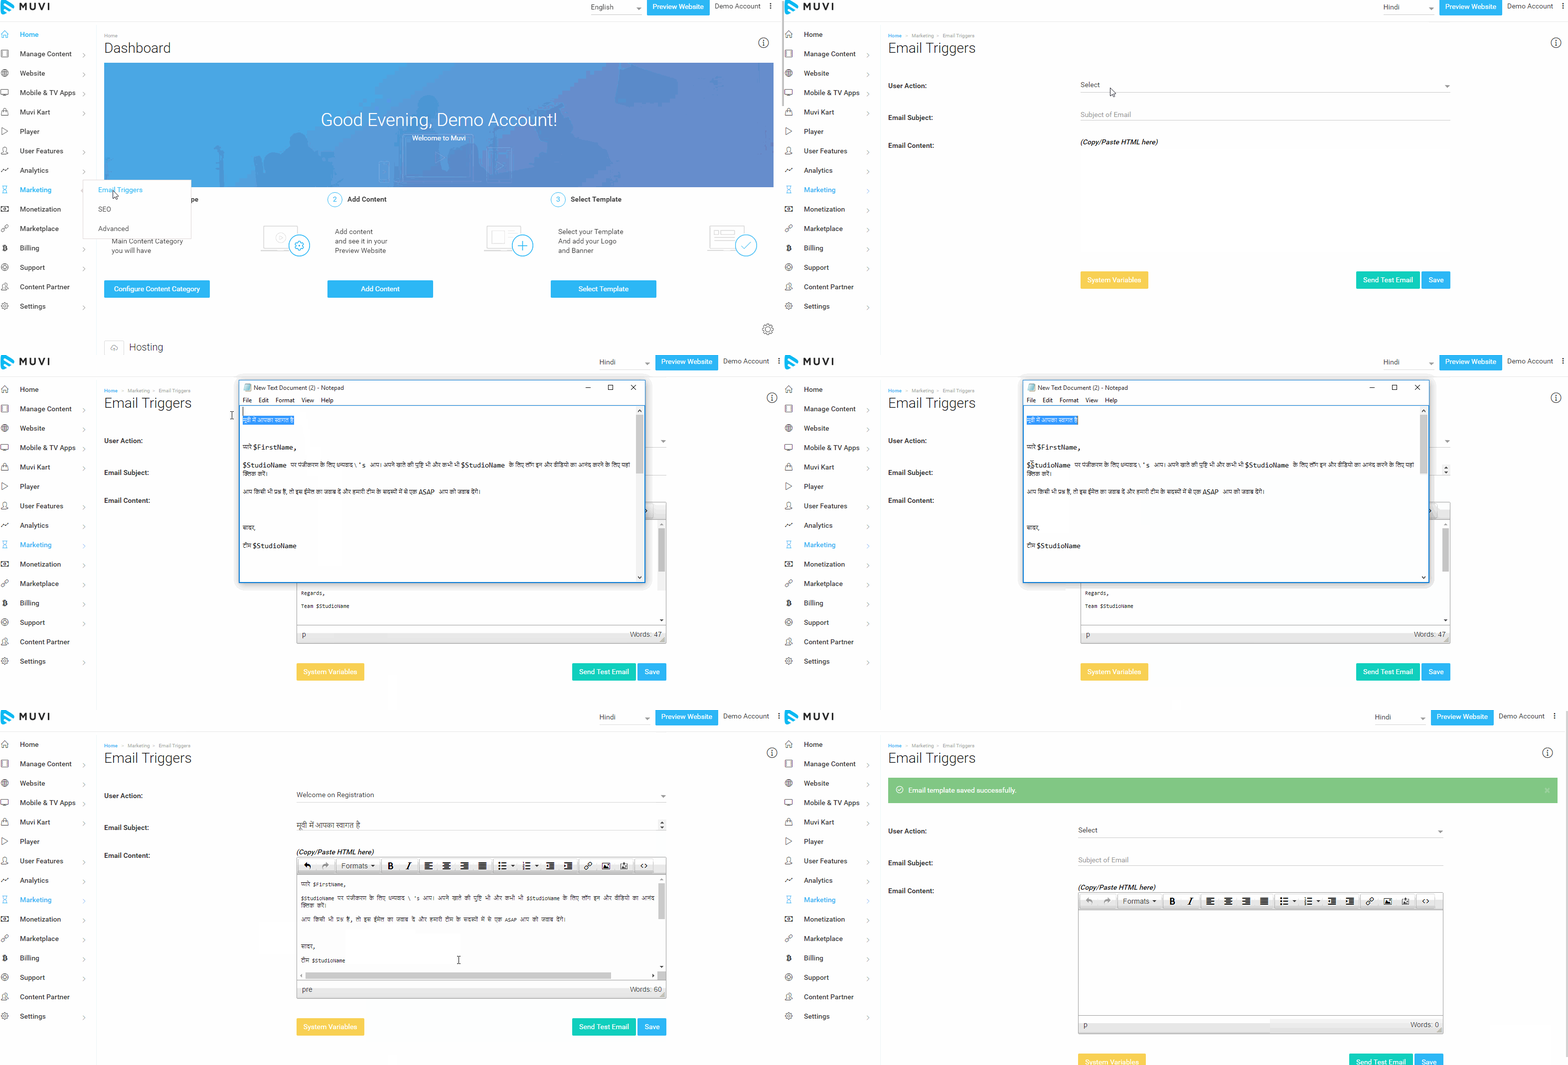
- To translate “Email Triggers”, go to “Marketing” -->“Email Triggers” in your CMS.
- Select the Language from the drop-down menu in the CMS (If you want to translate the Email Triggers in Hindi, then select Hindi form the drop-down list)
- Select the Email Trigger that you want to translate from the drop-down menu (For Example, "Welcome on Registration")
- Change the language of Email Subject and Email Content from English to the language which you have selected from the drop-down list.
- Finally, click on “Save” to save the translation.
Note: English is the default language. Please do not change the content from English to other language when English is selected. Always do the translation by selecting the preferred language from the top right corner of your CMS.

This is a sample email (See Below Screenshot) how your subscribers will receive the "Welcome on Registration" email when they register to your website by selecting the Hindi language option from the drop-down menu on your homepage.
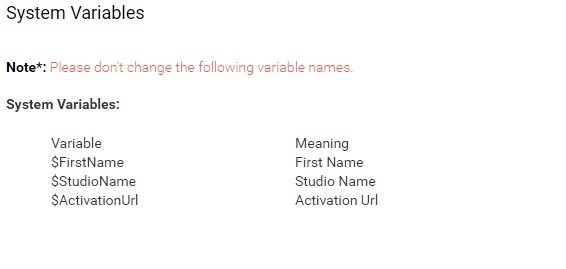
Note: When translating Email Triggers, Do Not Change The “System Variables”. The system variables should be in English. Please see the below screenshot for system variables. (For example, "प्यारे $FirstName, $StudioName पर पंजीकरण के लिए धन्यवाद". Here the System Variables remain same, whereas other sentences in the email are changed to Hindi)
Adding New Language Key
If you want to translate a term that is not listed under the Language Key then you can add a new "Language Key" for that term. For example, if you want to translate the word "Produced By" and that is not listed under the language key, then you can add it.
- In the Translation page of the CMS, click on “Add Keyword” (See Below Screenshot).
- Type the “Language Key” (For example, "produced_by") and its Name in original English (i.e. "Produced By") in the corresponding field
- Finally, click on “Save”. The new Language Key will be added to the Translation page.
Note: After adding the new translation key, you need to update it in your existing template to display it on your website/app.

Functionalities/Pages That Support Translation
By using our Language Translation feature, you can translate your entire website and apps. You can translate the following sections by using this feature.
- Content Metadata
- Custom Metadata Fields
- Static Pages
- Blogs
- Menu
- Messages
- Email Triggers
You can select the language from the language drop down menu from the top header to translate each functionality/page.
Note: This process is consistent across all pages and functionalities that support multiple languages.
How Your Website Get Translated
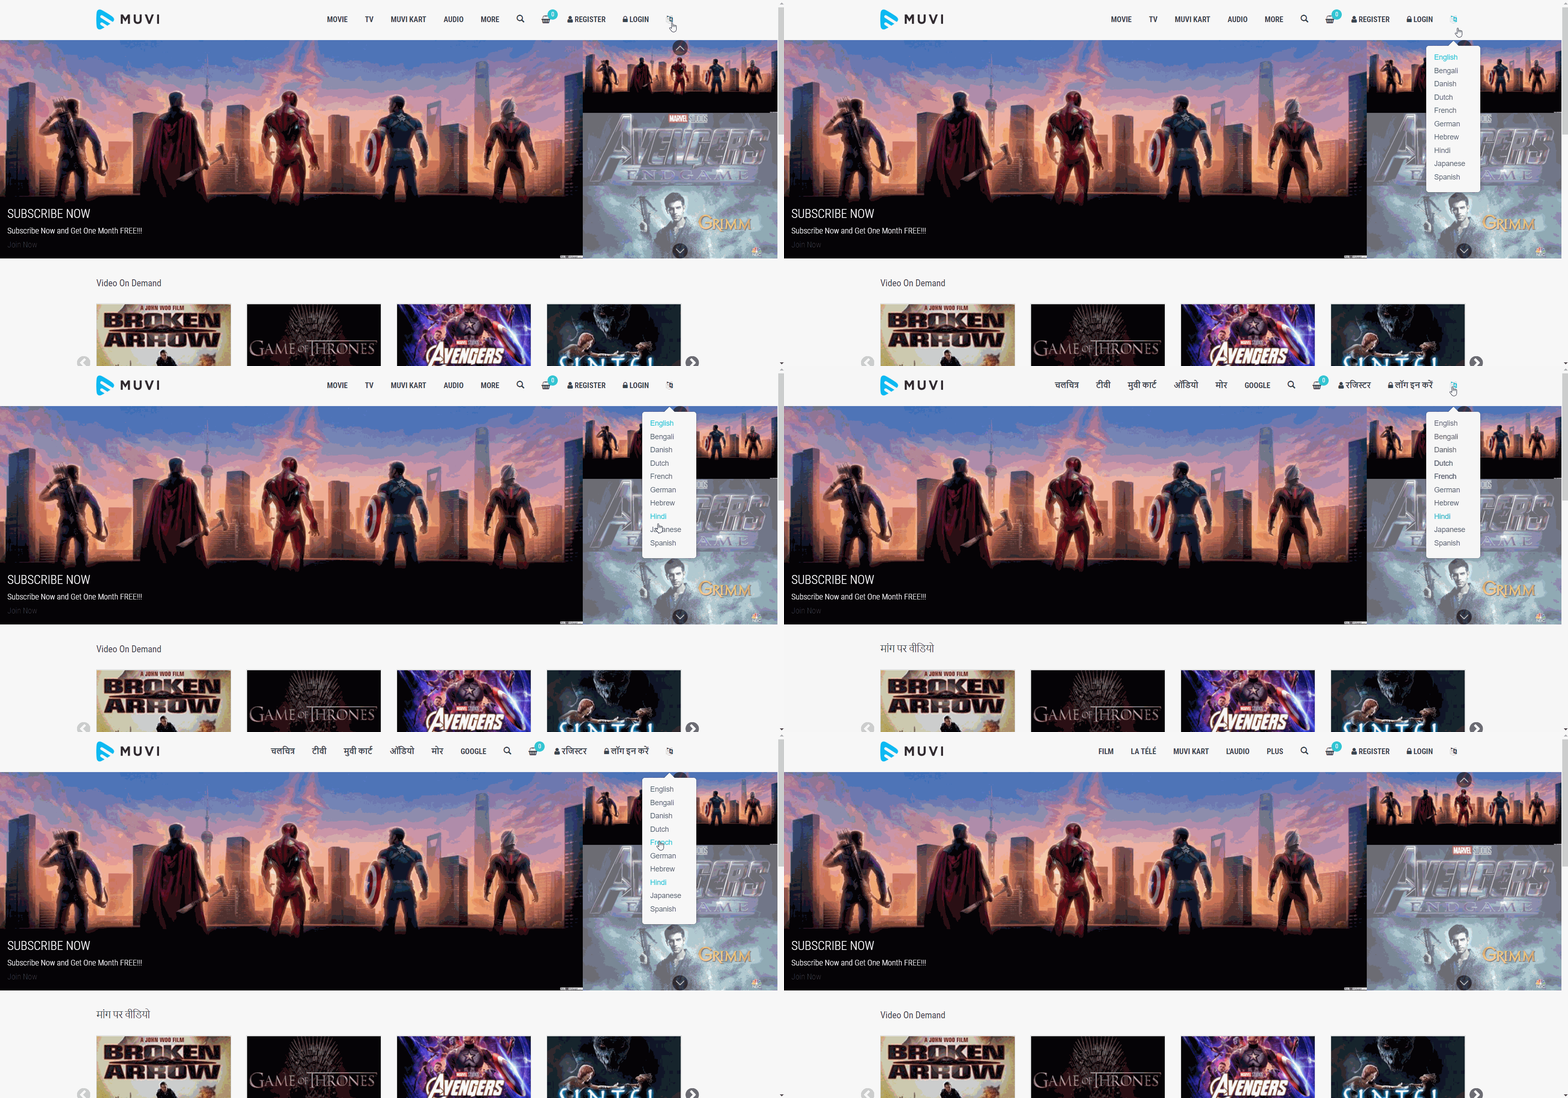
When your subscribers visit your page and they want to translate the content of your webpage into a certain language, they need to select the language from the drop-down menu. When they select the language, the webpage will be automatically translated into that particular language. (See below screenshot)
Show/Hide Language on Website
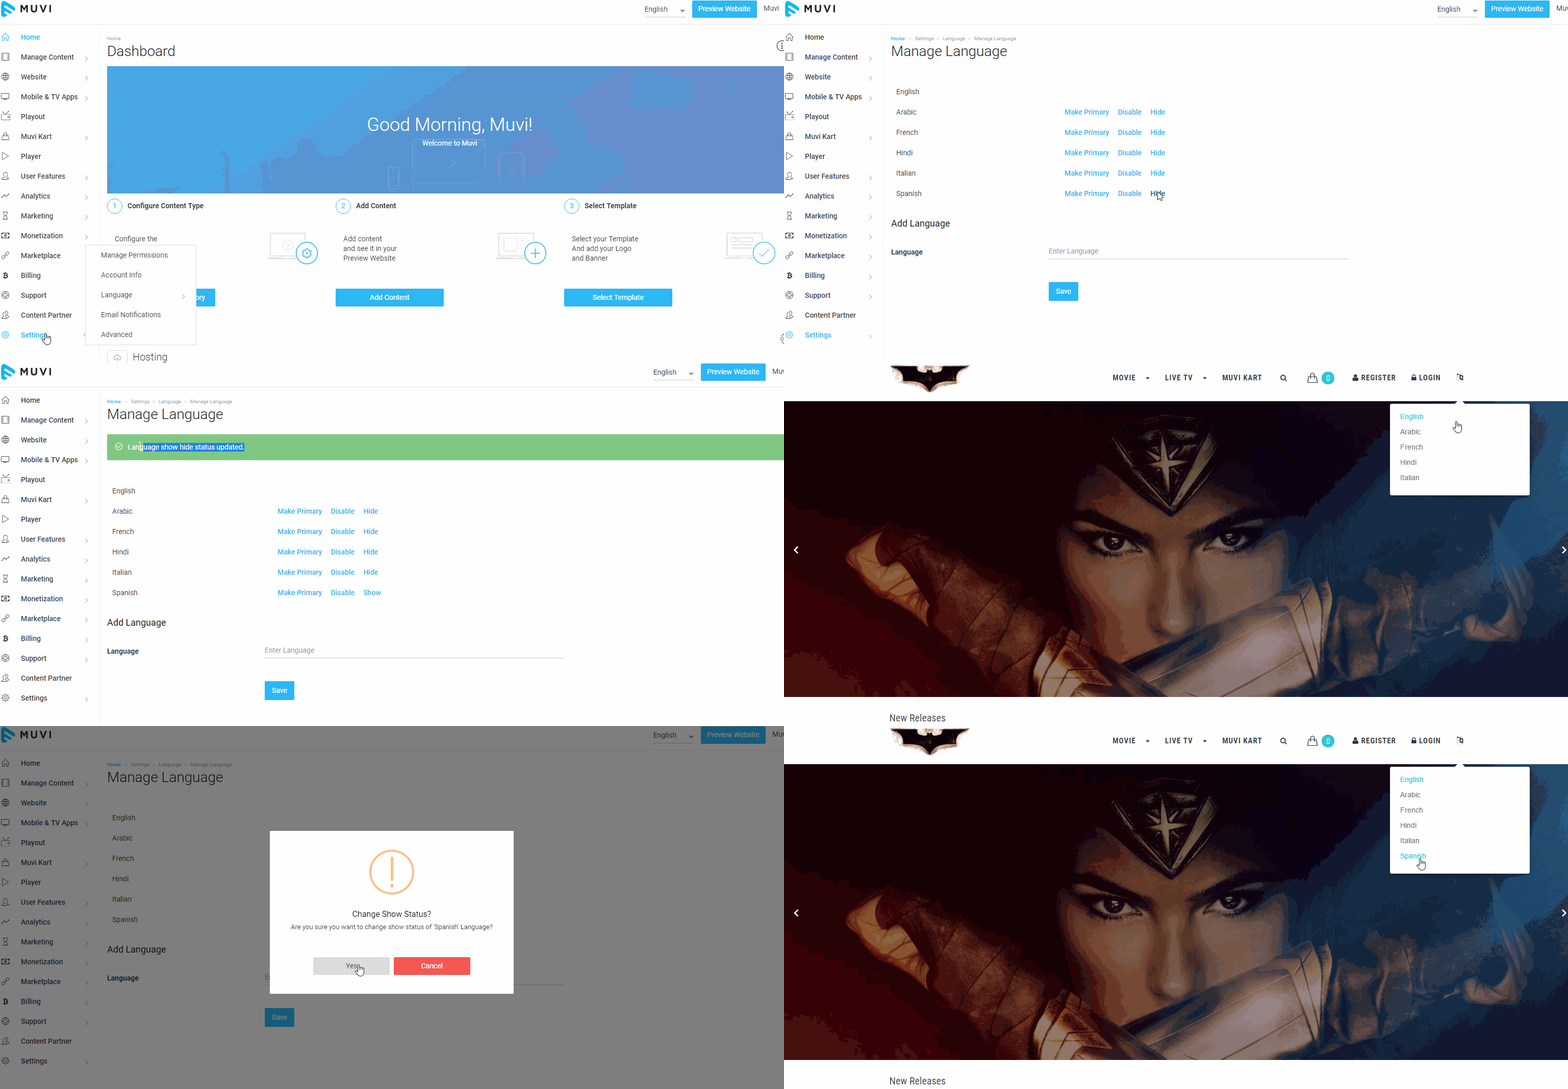
If you wish to show/hide any language in the language drop-down list of your website, you can do it so in the CMS.
- To hide any language in the drop-down list, go to "Settings"-->"Language" --> "Manage Language"
- Click on "Hide" on the right-hand side of the language, next to 'Disable"
- When asked for confirmation, click on "Yes"
The specific language will not be displayed in the language drop-down list of your website.
If you want to show the language in the drop-down list again,
- Go to "Settings"-->"Language" --> "Manage Language"
- Click on "Show" on the right-hand side of the language, next to 'Disable"
- When asked for confirmation, click on "Yes"
The specific language will be displayed again in the drop-down list
Note: You cannot Show/Hide default language.
RTL Support for Languages
Only a few languages in the world use RTL (Right to Left) text direction. For example, Arabic, Persian, Urdu Sindhi and Hebrew. Muvi supports RTL languages and allow you to translate your platform into a RTL supported language for the benefit of your users. RTL support is avaibale for Website, TV Apps and Mobile Apps. So, you don't need to worry about the interface change of your Apps when the language text direction changes from right to left.
Let us know so that we can improve.

February 24
12:00AM PST
Introducing TrueComply: Scaling Video Compliance with AI Automation
Video compliance has always been a critical requirement for broadcasters—and today, OTT platforms, streaming services, and enterprise video teams face the same challenge at a much larger scale.…...
Event Language: English

